Visual Communication Design.
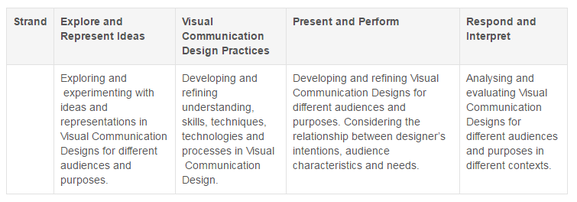
In Levels 7 and 8, students research and investigate the practices and viewpoints of designers in the creation of visual communications and gain an understanding of how to visually communicate ideas to an audience. They experiment and develop their skills in creative, critical and reflective thinking through the use of a design process. Students consider social, ethical, economic, and environmental factors of visual communication design practice.
Students identify, analyse, interpret and evaluate visual communications from a range of cultures, times and places. They investigate the use of visual language through the use of drawing conventions, design elements and principles and how these communicate ideas to different audiences in different contexts and locations.
Students develop an understanding of safe and ethical practices when generating, developing and refining visual design presentations, including exploring sustainable practices.
Explore and Represent Ideas
By the end of Level 8, students identify and describe how designers use visual communication practices to respond to briefs in different historical, social and cultural contexts. They apply this knowledge in the development of their own visual communication practices.
Students select and use appropriate drawing conventions, methods, materials, media, design elements and design principles to create effective visual communications.
Students evaluate how they and others are affected and influenced by visual communications from different cultures, times and places. They identify and describe practices of visual communication designers in visual communications from different cultures, times and places.
Students identify, analyse, interpret and evaluate visual communications from a range of cultures, times and places. They investigate the use of visual language through the use of drawing conventions, design elements and principles and how these communicate ideas to different audiences in different contexts and locations.
Students develop an understanding of safe and ethical practices when generating, developing and refining visual design presentations, including exploring sustainable practices.
Explore and Represent Ideas
- Explore and apply methods, materials, media, design elements and design principles to create and present visual communications (VCAVCDE001)
- Use manual and digital drawing methods and conventions to create a range of visual communications (VCAVCDV002)
- Develop and present visual communications for different purposes, audiences and in response to specific needs (VCAVCDP003)
- Identify and describe the purpose, intended audience and context in a range of visual communications from different historical, social and cultural contexts(VCAVCDR004)
- Identify and describe the use of methods, media, materials, design elements and design principles in visual communications from different historical, social and cultural contexts (VCAVCDR005)
By the end of Level 8, students identify and describe how designers use visual communication practices to respond to briefs in different historical, social and cultural contexts. They apply this knowledge in the development of their own visual communication practices.
Students select and use appropriate drawing conventions, methods, materials, media, design elements and design principles to create effective visual communications.
Students evaluate how they and others are affected and influenced by visual communications from different cultures, times and places. They identify and describe practices of visual communication designers in visual communications from different cultures, times and places.
Helpful files for all year levels
|
| ||||||||||||

|
         Font Space – this is one of the best sites as they claim to have 21, 043 fonts in their database. You can choose from the popular ones, or you can look for the newly uploaded ones. It’s up to you. Just click the font name or image and download.
1001fonts - this one’s also claiming a thousand fonts. The only difference of this site from fontspace is that you could actually buy premium fonts here. Other sites: dafont, 1001freefonts, fonts. |
Years 7/8 Visual Communication 2020
Week 2.
Your Visual Diary. |
(VCAVCDV002) |
Your Visual Diary should remain neat and organised at all times. Your Visual Diary should resemble a journal of your learning experiences over the semester.
You should also use your computer as a Visual Diary. Tutorials for specific computer programs are excellent if kept this way.
It is important that you source any images you find and use in your visual diary. If you use Google Images, please make sure you click through to the website and get the reference for the webpage.
Be original, explore, develop and refine your work constantly. All design goes through multiple stages of refinement to get to a final product. These refinements are all part of your assessment. Therefore if it does not work the first time - try again!
Your Laptop.
Your laptop is a valuable resource and must be charged and ready for use at all times. All work, examples and instructions appear on this webpage and there are numerous resources that can help you with your work. Please make sure that your Network folder remains organised and that you delete/remove any files/folders that are NOT school related. I will need to be able to find your files/folders easily - if I cannot find them, it wastes my time and I do not go looking for them. Especially true if I am going to print things for you.
Back up your work regularly. There is no excuse for losing work.
I do not want to see or hear anything taking place on laptops that is not work related in my classes.
You may listen to music at a low volume only during work time. Music must NOT be stored on the school Network. You should use an iPod or similar or store your music on a USB. Your music should not interfere with yours or others' work. This includes constant shuffling of music, sharing listening devices, volume issues and using devices while I am talking or during other specified times in class. It is a privilege not a right.
Fineliner borders, 10mm from edge on all pages.
Measured and ruled!
Measured and ruled!
LEAVE FIRST PAGE BLANK.
|
|
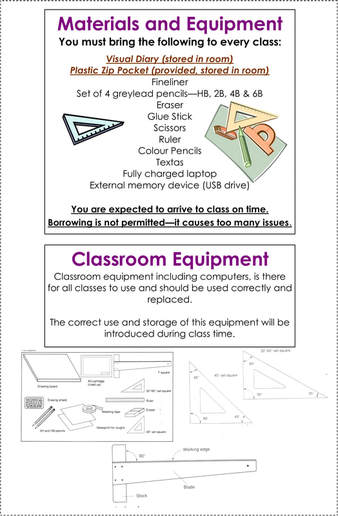
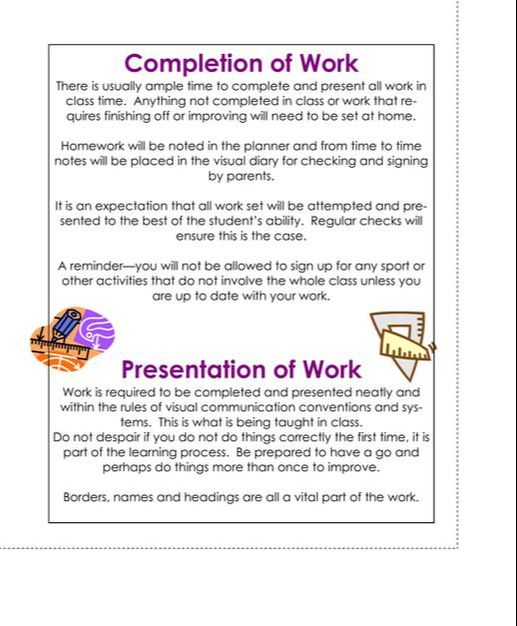
PAGE 3: Materials & Equipment & Classroom Equipment PAGE 4: Completion & Presentation of work.
Week 2.
Demonstration of ruling borders.
|
Complete your front page, get me to print it, neatly add colour and pattern.
|
|
Weeks 3 & 4.
Do the following quiz: http://www.ironicsans.com/helvarialquiz/
PAGE 2:
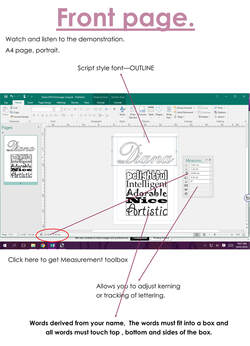
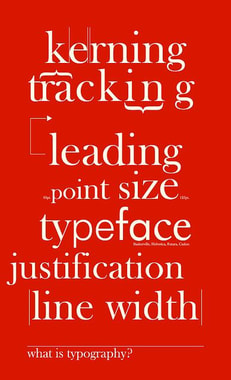
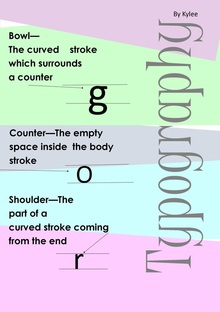
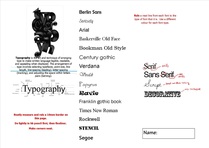
Visual Diary Front Page - exploring typography.
Using publisher and a variety of fonts, upper and lower case, spacing and other variables. Demonstrate a knowledge of effective typography.
Fineliner decoration INSIDE letters of your name. Colour pencil showing skills in blending and shading outside letters. You may use gold/silver pens inside letters also. Refer to zentangles for pattern idea. (Google or Pinterest)
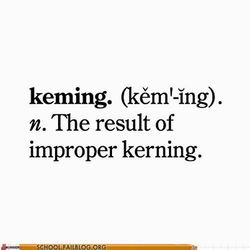
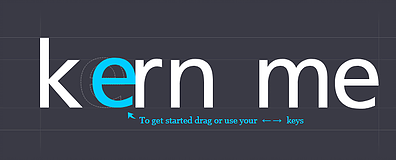
- Name - outlined - kerning & tracking.
- Each letter of your name indicating a feature about you. Fitted into a rectangular shape, size and style of letters to be considered. Line spacing, use of text boxes and even formatting.
- *SEE EXAMPLE.
|
|
Inside the outline of your name, you are to use black fineliner and decorate with patterns.....refer to the example.
Blended colour pencil around the words. 
|
|
No stamp = Not finished.
Demonstration and examples:
To help you with your poster, open the above file and refer to it to help you out.
|
| ||||||||
Demonstration using Publisher for poster.
|
Page 7
|
Page 8
|
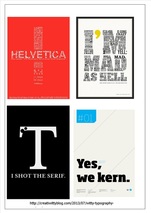
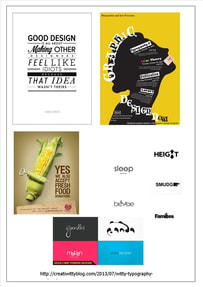
Completed task - 4 examples of creative type, including web references. (VCAVCDE001) (VCAVCDR004)
*There is to be no inappropriate imagery that depicts violence or conflict.
*There is to be no inappropriate imagery that depicts violence or conflict.
|
Page 8 will be an A4 version of your poster.
|
Week 5
Before the end of the session today (Wednesday) please check that your Photoshop is working. NOT Photoshop Elements!
|
General Comments and Reminders!
Sticky notes inside front cover - read but do NOT remove! Borders - MUST be measured and neatly ruled in fineliner. May be ruled over the top of stuck in pages if you did not trim properly. Neatness - trim, stick, rule......NEATLY! (Upside down or crooked is not neat.) Make sure you READ instructions and look at examples. Stay up to date - do some homework please. Even if it is only getting your borders right! If work is NOT printed, please check it is done properly as I may have put some notes on the work. Remove printed work out of the 'To Be Printed' folder once it is printed as I do not need to print them again. |
Typography games.
|

|
Thursday...Photoshop demonstration.
(VCAVCDV002)
Photoshop reference sheet.
Photoshop reference sheet.
A photoshop alphabet.
Complete the alphabet using Photoshop. Each letter must be in a different font, a different colour and on a different layer. You will put a screen shot in showing your layers presented along with the finished work. Page 11.
Complete the alphabet using Photoshop. Each letter must be in a different font, a different colour and on a different layer. You will put a screen shot in showing your layers presented along with the finished work. Page 11.
|
|
Your name.
Using the letters of your first name, create at least 4 versions of a linked up logo. A4. Make it a decent size.
Photoshop:
|
Week 6.
*Wednesday - no class. Interviews.
Thursday.
Read all the way to the end of these notes for this week.
If your page is NOT stamped, it is not complete. Do not ask me why but rather take a good look at it and determine for yourself what needs to be done! Check it is done properly!!
Red marks on your page also outline areas for improvement!
If your page is NOT stamped, it is not complete. Do not ask me why but rather take a good look at it and determine for yourself what needs to be done! Check it is done properly!!
Red marks on your page also outline areas for improvement!
There is a black folder with pages in it for reference although some of the page numbers are different so double check - use it to reference but remember all instructions and information are on this web site also, so check there as well!
Some of you are falling behind and need to catch up sooner rather than later please.
Some of you are falling behind and need to catch up sooner rather than later please.
Common mistakes:
OKI is OK for printing......get anything A4 done and print via classroom laptops but check and do not waste colour printing. A3 (poster and logo work) needs to go to staffroom so need to go in a 'to be printed' folder on the network.
- Not measuring and ruling your borders neatly.
- Not completing set work and keeping up with what is required.
- Not reading instructions thoroughly or looking at examples.
- Move printed stuff out of your 'To Be Printed' folder once it is printed! Please let me know if you have A3 work to be printed and I will create a list so I do not have to search in everyone's folders!
- Wasting class time - if there is something you are stuck on or your computer does not work, there is always alternative work you can do, move on to something you can do until you can get help. CHECK YOUR PLASTIC POCKET FOLDER!!!! I may have put work in there and in most cases I have work to do that is weeks ahead on this page as well!!!!!!!!
OKI is OK for printing......get anything A4 done and print via classroom laptops but check and do not waste colour printing. A3 (poster and logo work) needs to go to staffroom so need to go in a 'to be printed' folder on the network.
3 ways to check .............Web page Workbook Folder.
Double session today.......typography games then finish poster (Page 9) and name logo (Page 12).
Make sure you are up to date! If you need help with the duplicate or link layers in Photoshop, try right clicking the layer you want to duplicate or link. Make sure you read through the instructions and have done everything that is asked.
Make sure you are up to date! If you need help with the duplicate or link layers in Photoshop, try right clicking the layer you want to duplicate or link. Make sure you read through the instructions and have done everything that is asked.
Stand up and get some headphones and then say 'Ms vanderSon is terrific' once you are up to this stage and have read all these instructions. Remain standing with your headphones on.
(Please use headphones)
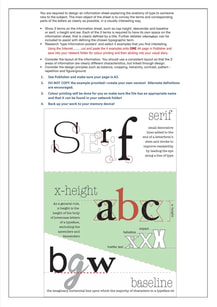
Serif typography game.
Difficult typography game.
More typography games.
Helvetica Vs. Arial
Typewar
Serif typography game.
Difficult typography game.
More typography games.
Helvetica Vs. Arial
Typewar
Week 7.
Ampersand project.
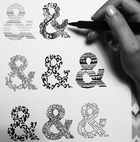
Work LIGHTLY in HB pencil first then finish off completely in fineliner. Can be completed at home. Page 13.

|

http://www.rachelbonnessdesign.co.uk/top-ten-free-fonts-with-the-best-ampersands/
|
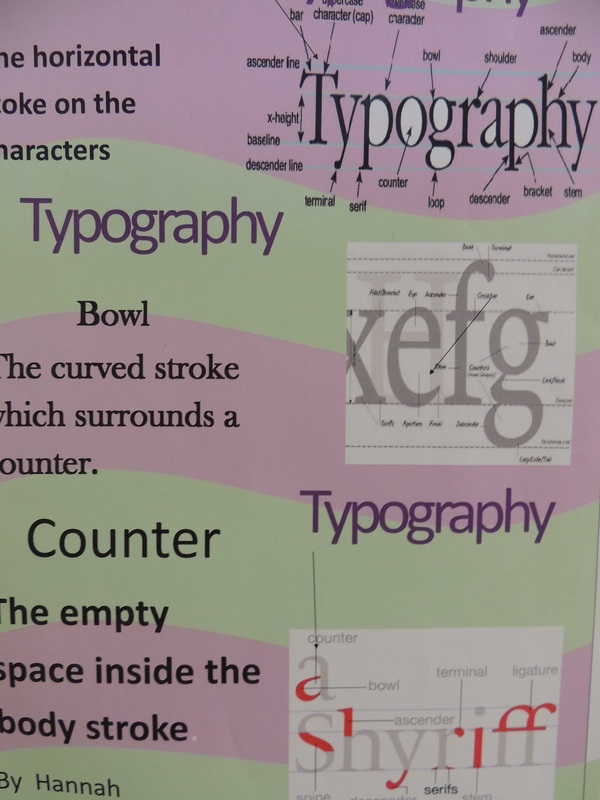
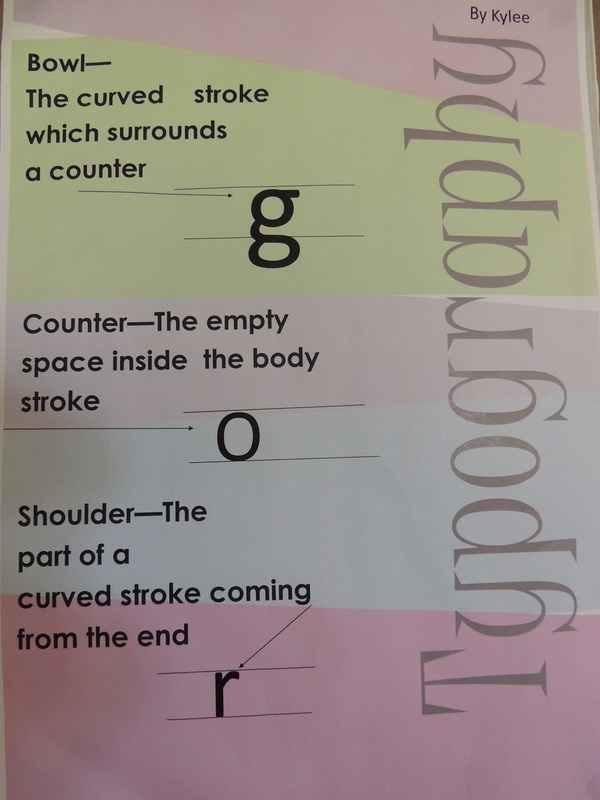
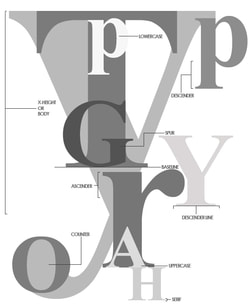
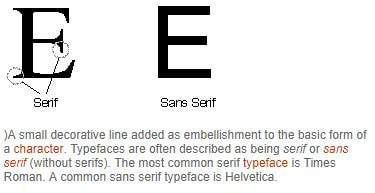
Definitions:
There is absolutely NO excuse for having work on the wrong page......you can refer to this web page where it is clearly marked, you can see the examples on the web page, you can see the examples in the folder.
Week 8.
Let me know if you have anything A3 to print! I am still missing a lot of A3 posters!!!
Your workbook should be up to date - that is why you took it home! I hope everyone has got their workbooks today as it seems you did not have them yesterday!
I notice some of you have not done your homework so guess what - you are winners again today!
Set squares - make sure you have both - I found one again. Not happy!
Emily V - how can you finish your ampersand work and put it in your workbook if it is in your pocket file?
Alex - number your pages correctly and make sure that you have put things on the correct page.
Alex - number your pages correctly and make sure that you have put things on the correct page.
Read and carefully look at all the information for week 8. We will watch youtube videos as a group. Click any links below.
Handouts - in your pocket folder, you will find 5 new handouts.
Handouts - in your pocket folder, you will find 5 new handouts.
- Trim and glue in pages 14, 15 & 17 in and rule borders.
- Complete the tasks on page 15.
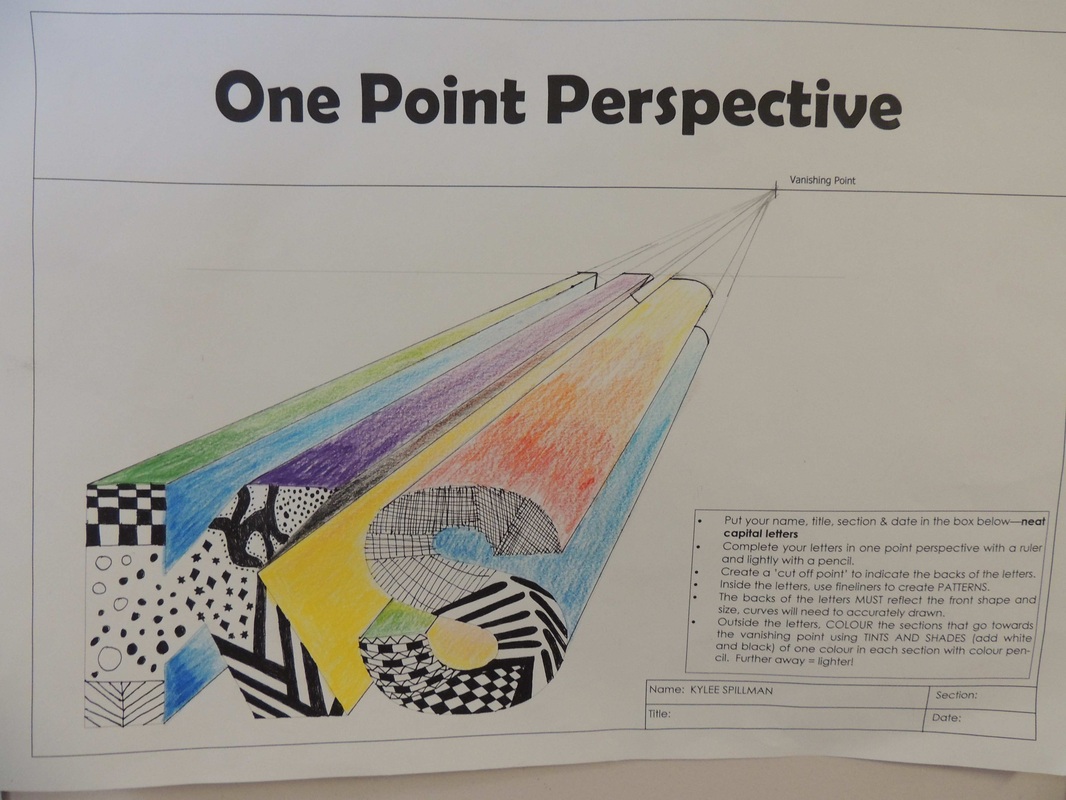
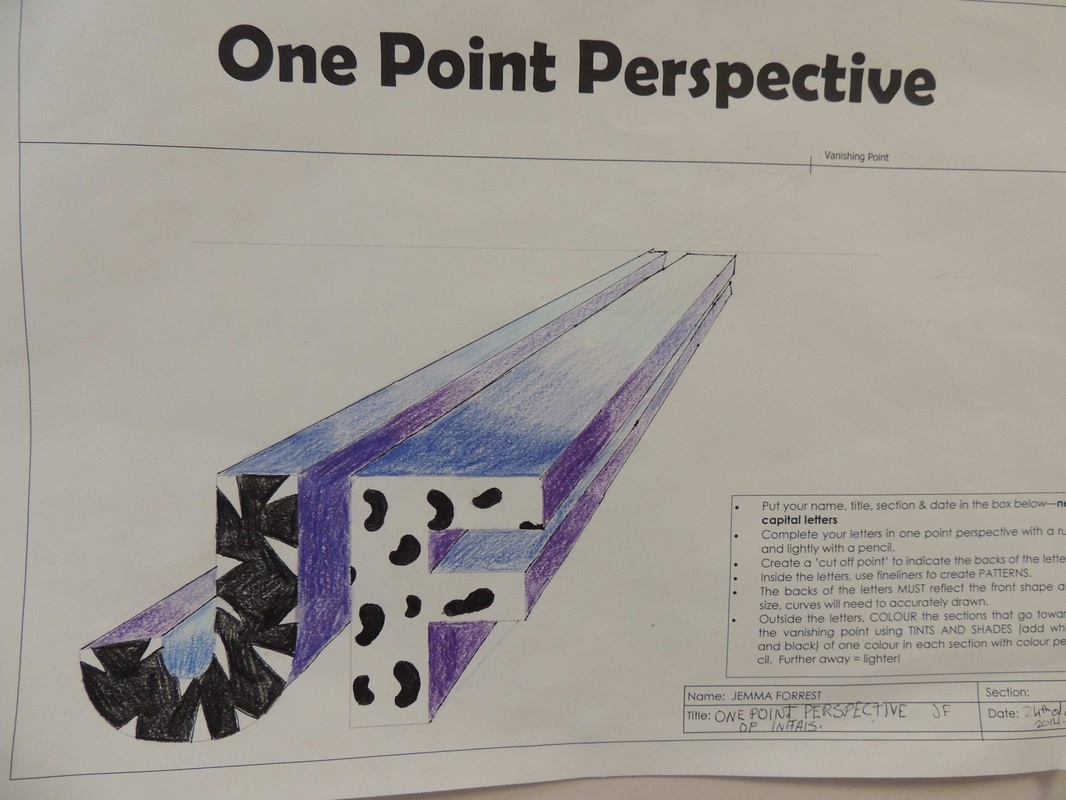
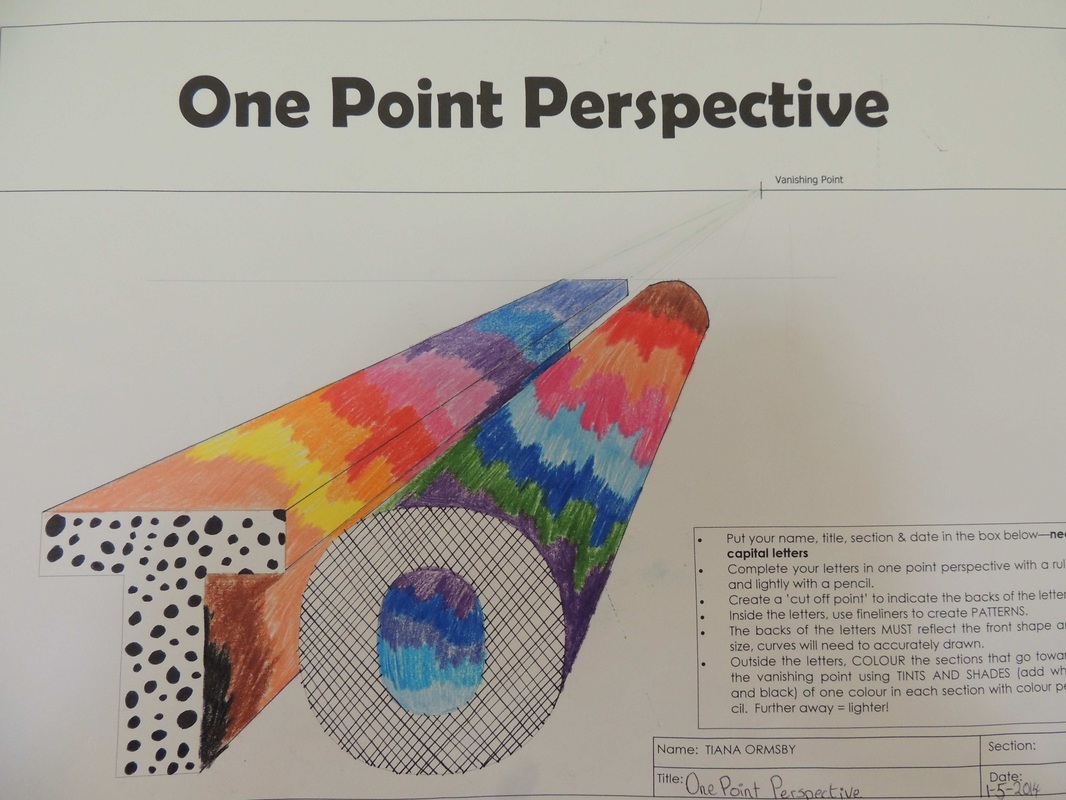
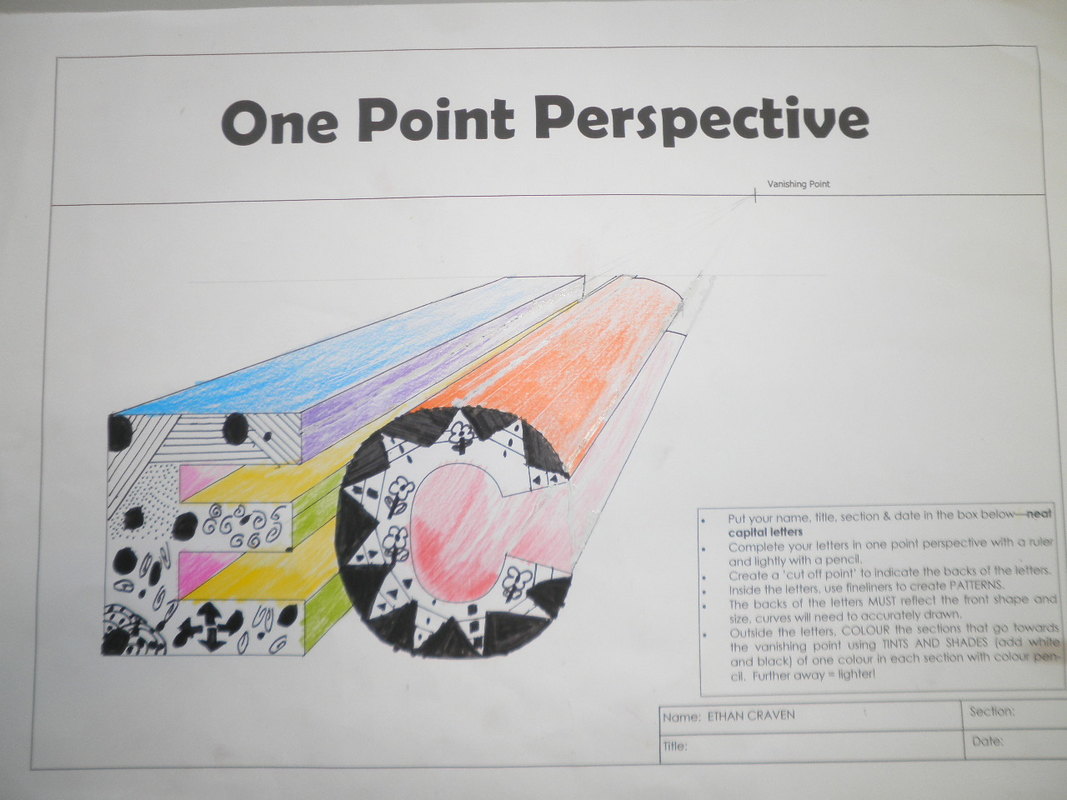
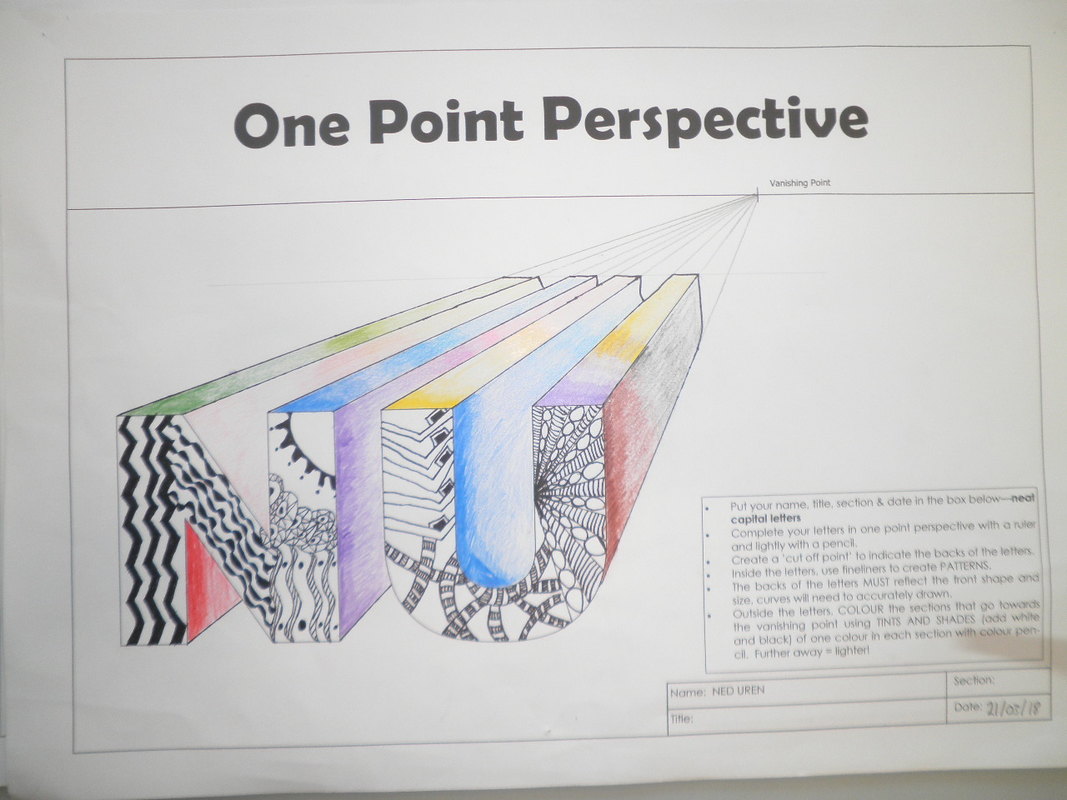
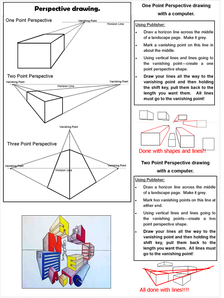
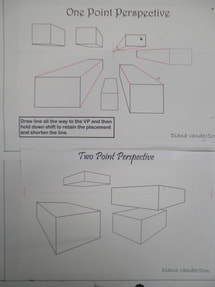
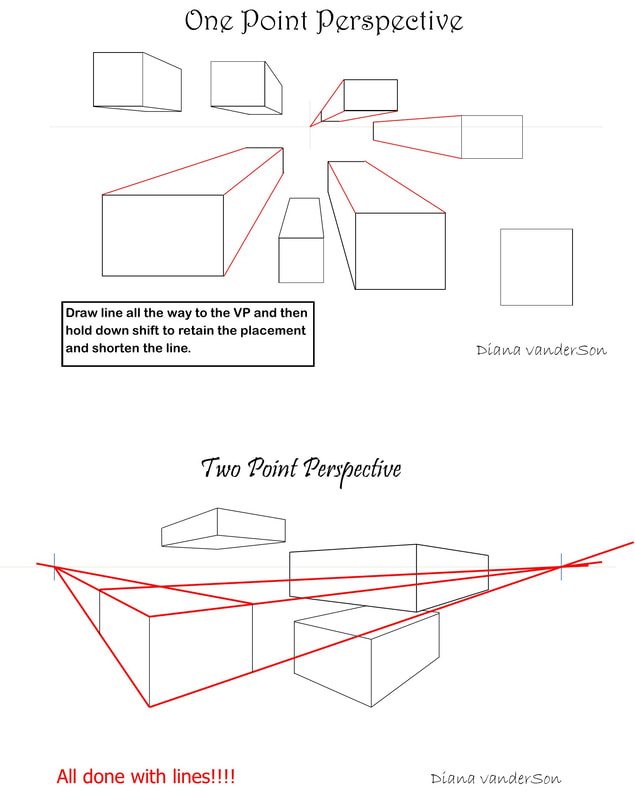
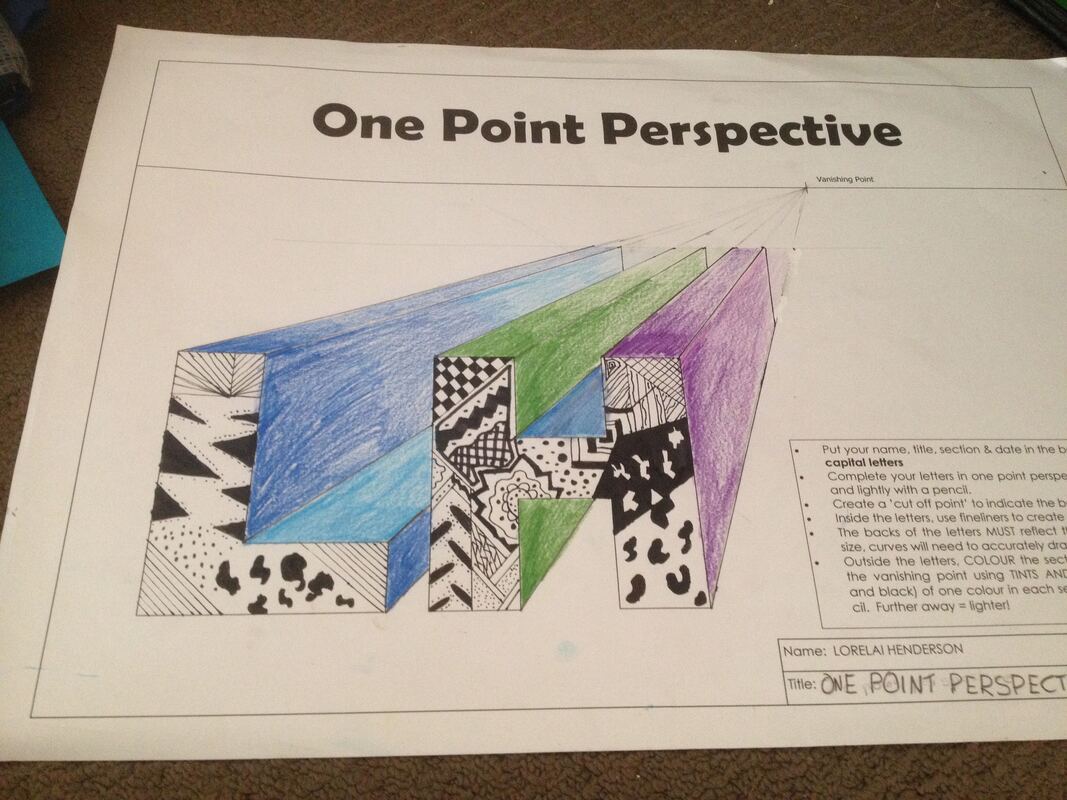
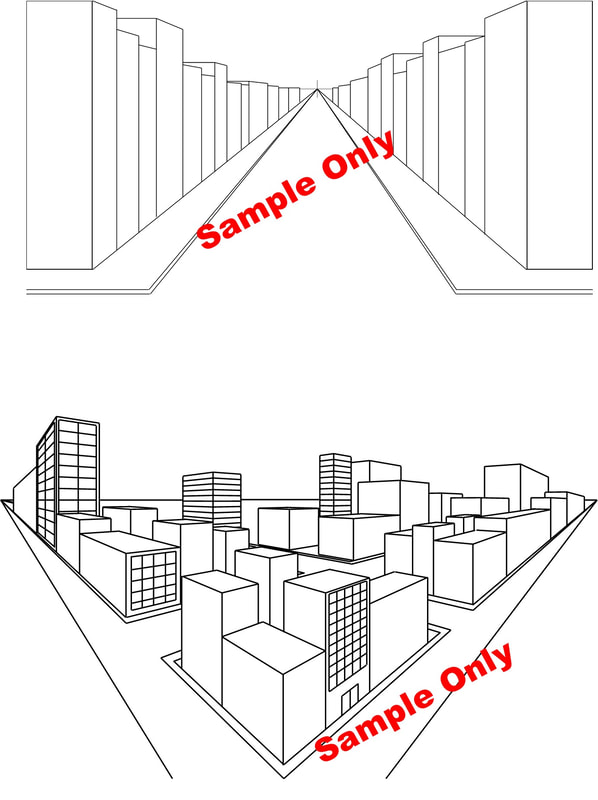
- One point perspective - LIGHTLY in hb pencil as you will need to rub out. Demonstration and see examples in folder and below of past work.
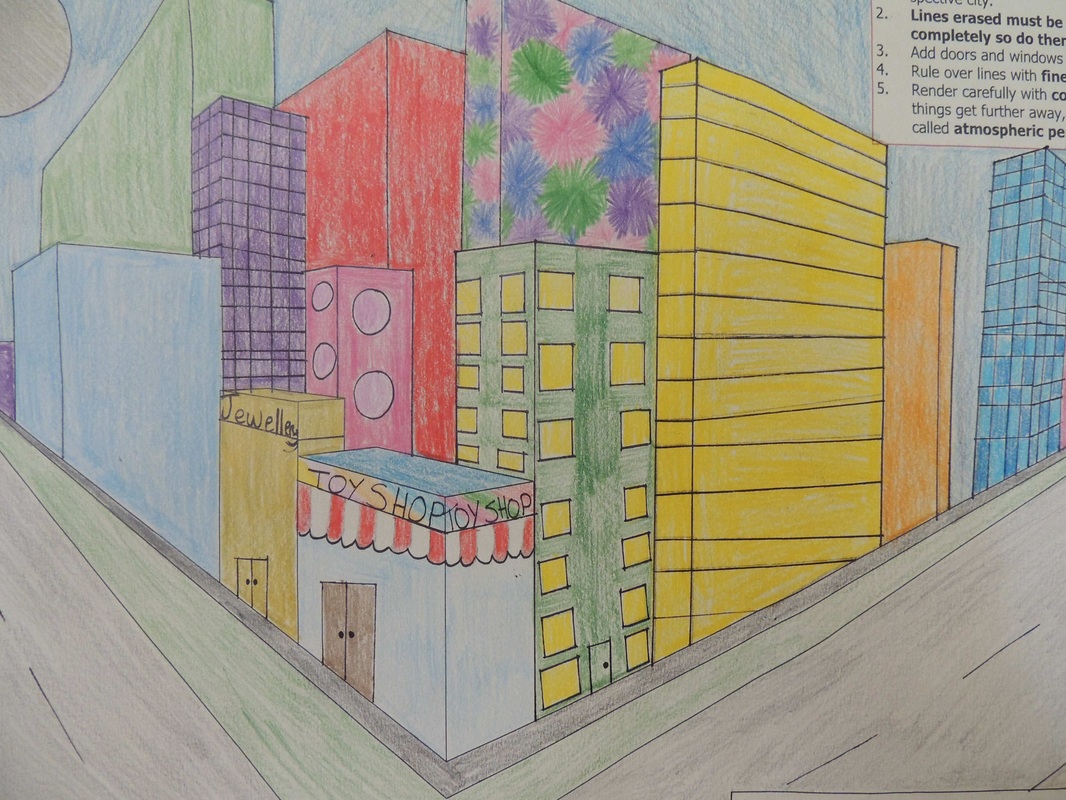
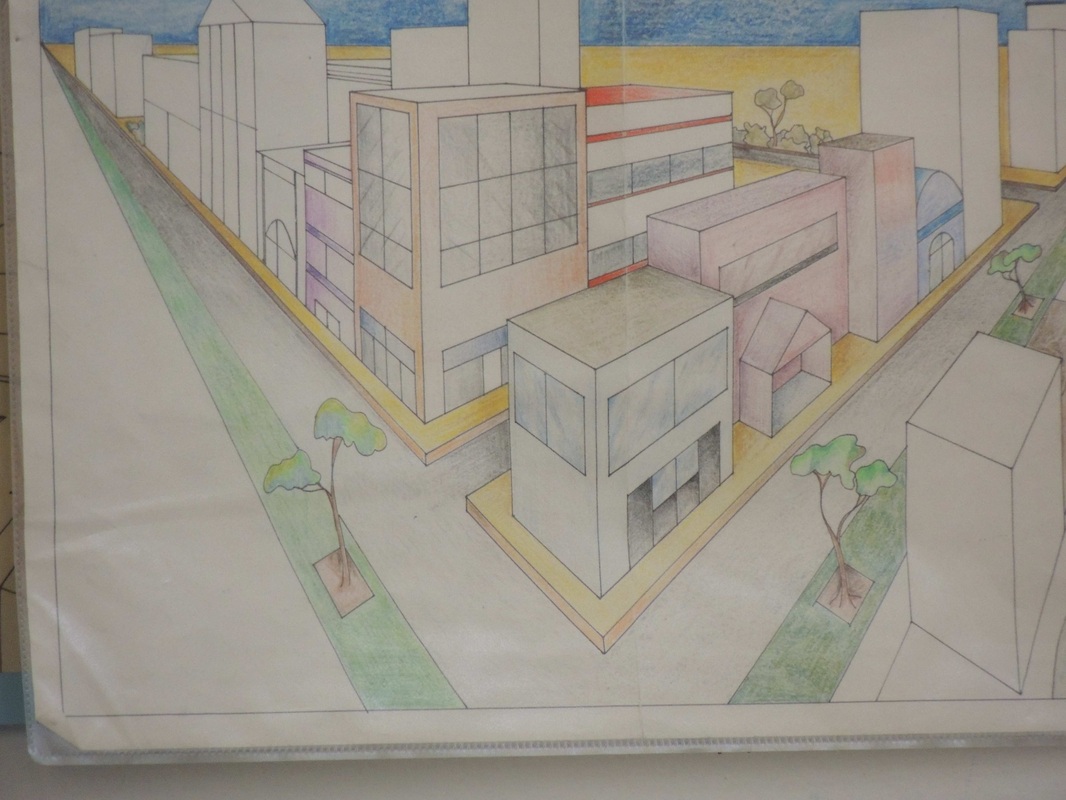
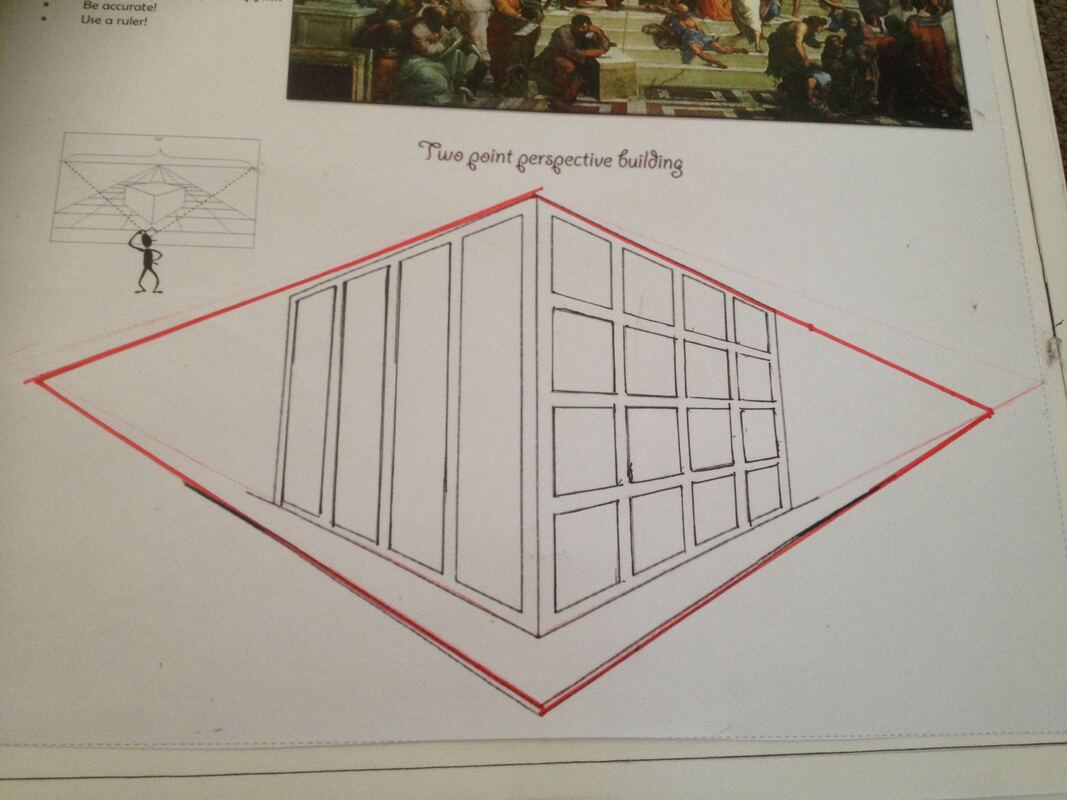
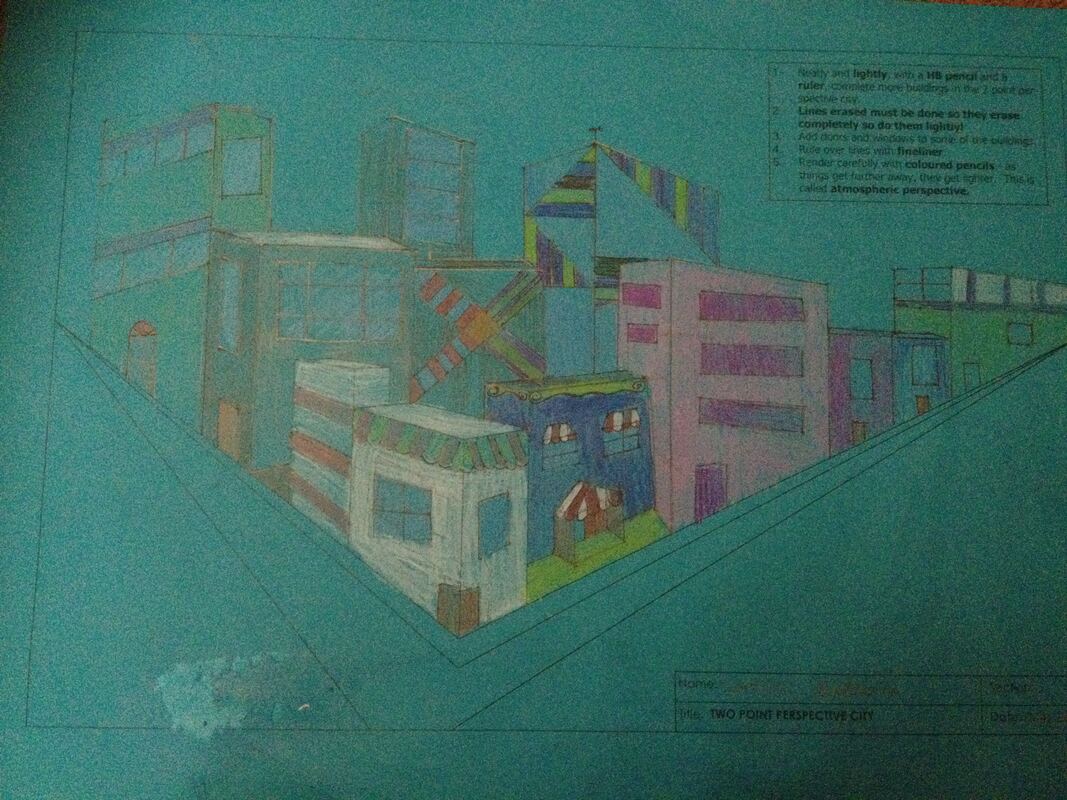
- Two point perspective city - LIGHTLY in hb pencil as you will need to rub out. Do not start until you have seen a demonstration! Examples in folder and on web page.
Introduction and explanation of perspective drawing.
Perspective Drawing. (VCAVCDV002)
|

|
     |
This task will NOT be stuck in your book - it will be stored neatly in your plastic pocket. DO NOT FOLD!
|
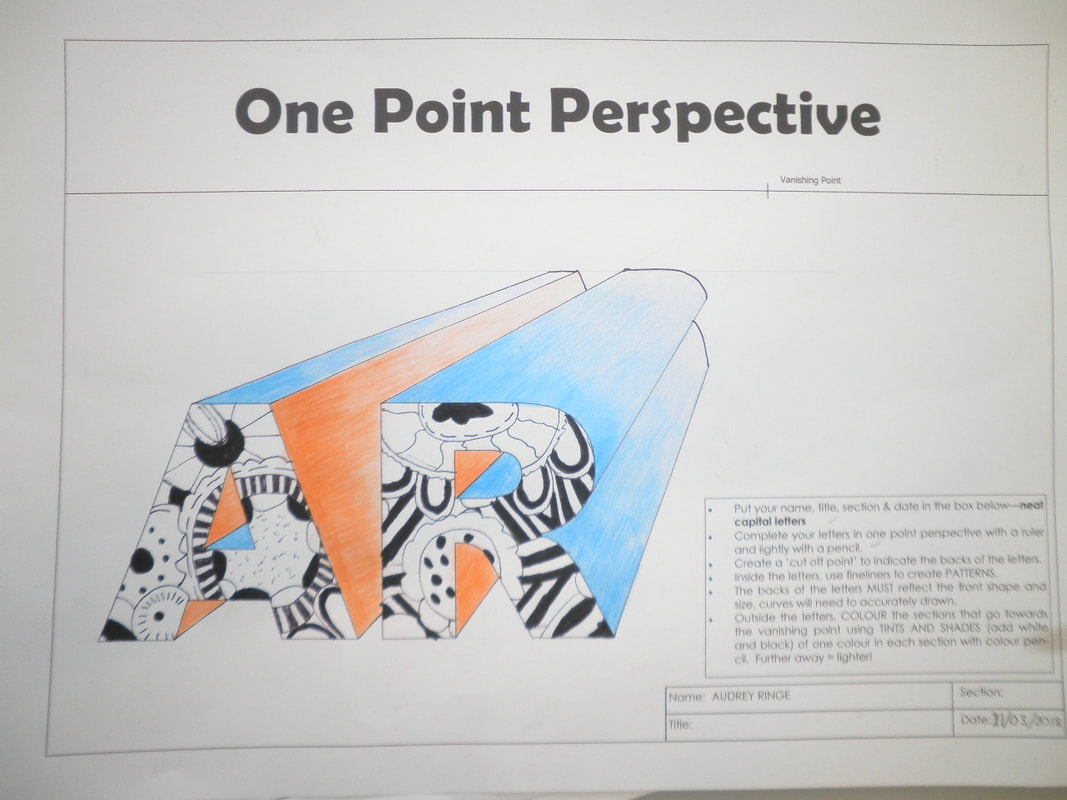
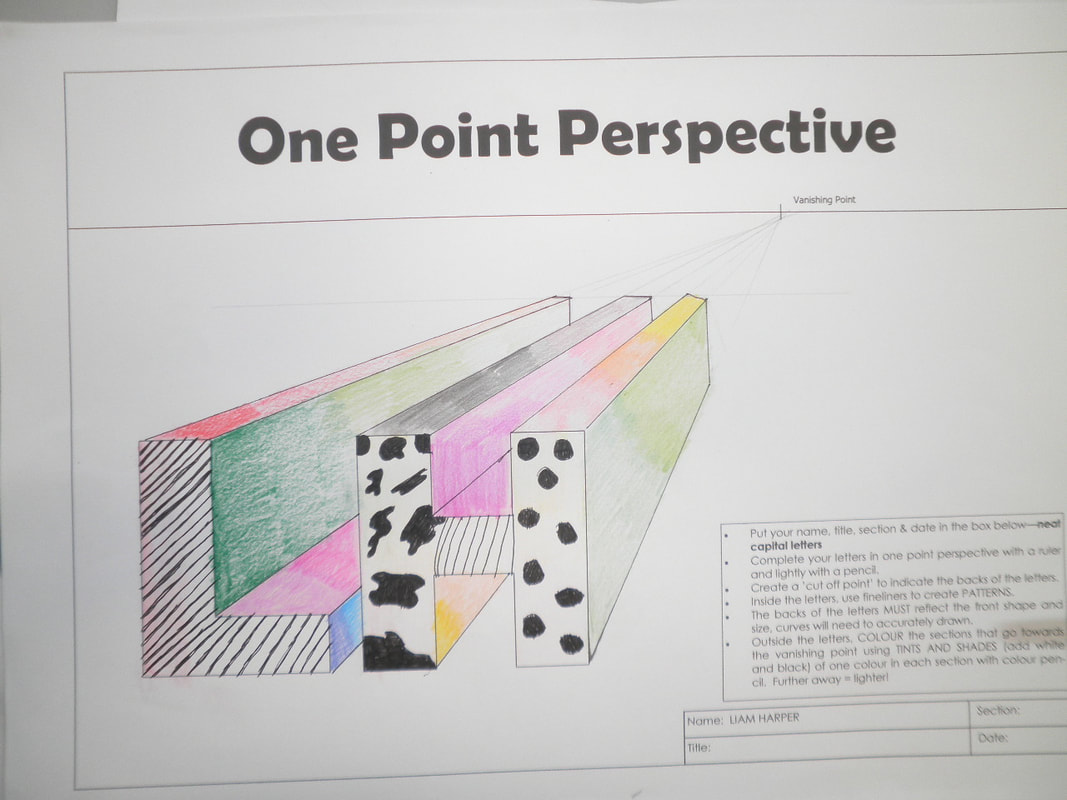
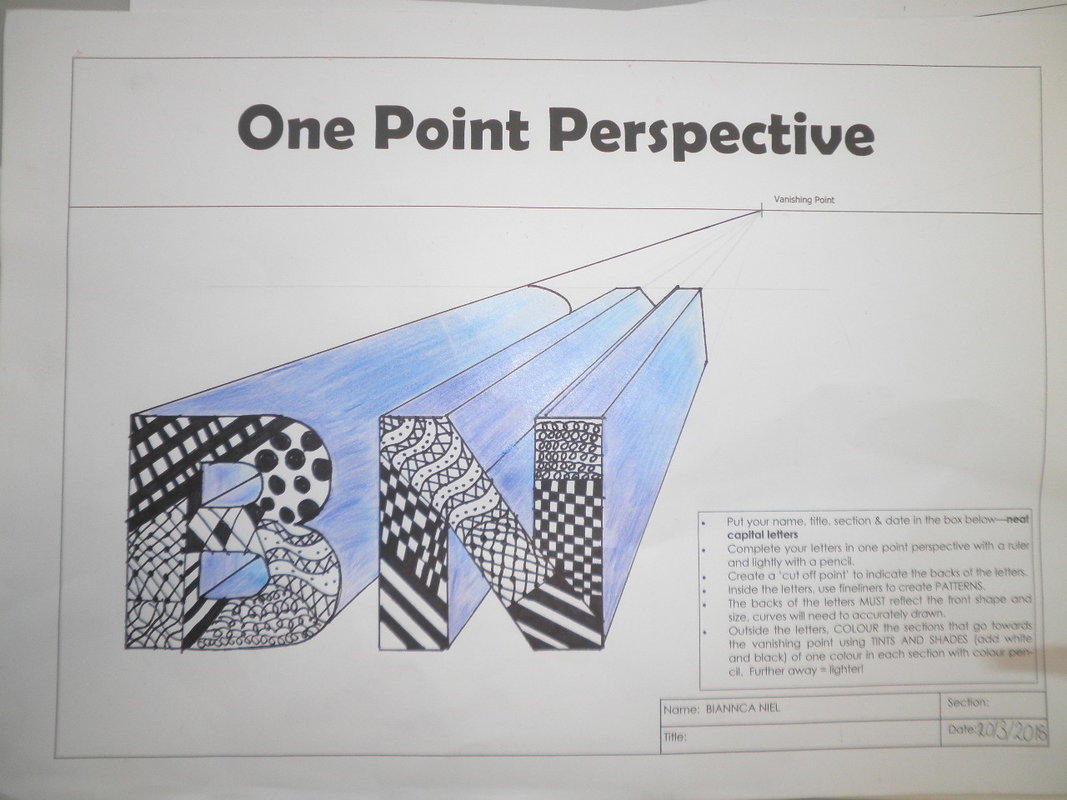
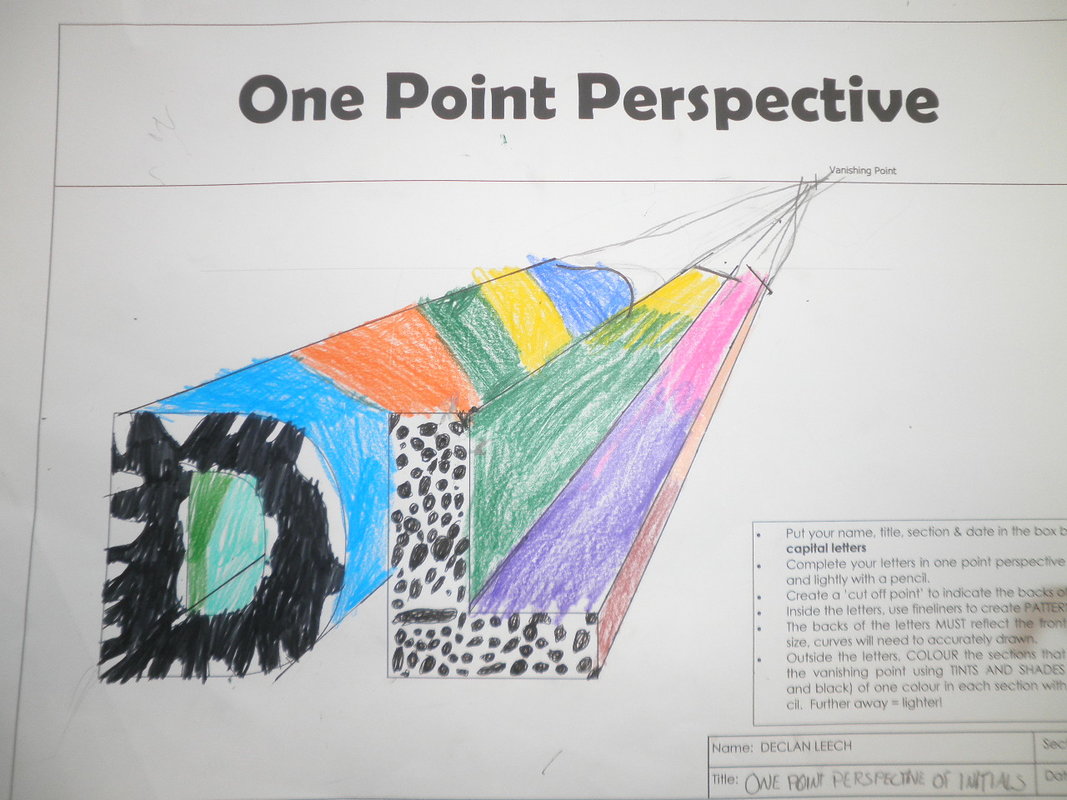
Always use a ruler - lightly in HB pencil first, then fineliner.
Page 14
|
|

|
|
|
|
|
|
|
|

|
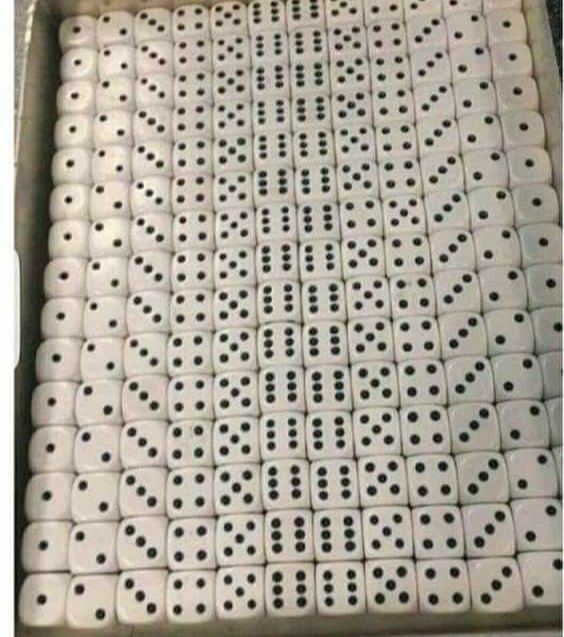
Quiz time - how well do you look at things?
Look carefully at this photo. Is there anything unusual about it? (Right click and open in a new tab so you can get a better view.) |

|
Week 9.
Complete the A3 sheets. One point perspective initials & Two point perspective city.
Both must be finelinered and rendered in colour pencil showing an understanding of distance, scale and atmospheric perspective.
Remember to use your ruler and be accurate!
DO NOT FOLD THE SHEETS AND KEEP THEM CLEAN!
Both must be finelinered and rendered in colour pencil showing an understanding of distance, scale and atmospheric perspective.
Remember to use your ruler and be accurate!
DO NOT FOLD THE SHEETS AND KEEP THEM CLEAN!
Start of Remote Learning:
Last Thursday 19th March, you were directed to take your workbooks and pocket folders home. It is disappointing that some of you have left them here at school and are not here to collect them. This work was set specifically so that you do not have to rely on the internet.
You may be able to arrange to get them if you ring the school. You are required to spend time doing your perspective work. It is difficult without giving you a demonstration BUT there are plenty of examples and some videos that will help you out. This week, you should at least do the light greylead lines on each of the one and two point perspective worksheets in your pocket folders.
|
Copy and paste this image into Publisher and put a circle on the heart in the following image - do not tell anyone when you find it!
|
Copy and paste the image into publisher and put a circle over the mistake. Do not tell anyone when you find it.
|

|
|
|
Continuing Perspectives.
Term 2.
Week 10.
This.is the first week of remote learning. You guys are great at this and have it nailed as you use this web page all the time. Please just go through all the areas above to just refresh what has been done and what we are doing now. Watch the videos, look at the examples and instructions!
Let's look at page 15 - you need to do the activities on this page as per the instructions for Week 9 so have a look back and find the vanishing points. This was meant to be done in class. Hints are on Compass.
You MUST use a ruler and follow the lines that are there and not just make them up.
Also on this date, submit your 1 point perspective initials and your progress on your 2 point perspective cities. I really need to monitor your cities as this is quite involved piece. Again, I cannot stress enough for you to look and read the instructions above - they are very clear. If you are confused, send a picture and ask a question!
I need to see progress!
Let's look at page 15 - you need to do the activities on this page as per the instructions for Week 9 so have a look back and find the vanishing points. This was meant to be done in class. Hints are on Compass.
You MUST use a ruler and follow the lines that are there and not just make them up.
- On the one point perspective - you only need to find about 4 or 5 lines that will lead to the vanishing point. Use the lines on the building/floor.
- To do the building, you need to work lightly in hb pencil and then fineliner with a ruler as you will be rubbing out! Find the VP's first!!!!
Also on this date, submit your 1 point perspective initials and your progress on your 2 point perspective cities. I really need to monitor your cities as this is quite involved piece. Again, I cannot stress enough for you to look and read the instructions above - they are very clear. If you are confused, send a picture and ask a question!
I need to see progress!
Weeks 11 & 12
Finish ruling your 2 point perspective city street and colour in using shading correctly.
Doing perspectives with Publisher.
Demonstration and reference pages on Compass as well.
There is an instruction video on Compass for the 6 shapes in 1pp and 2pp.
I used a plugin for Chrome called Screencastify to record my screen - download and have a go yourself! You can add it from the Google store or do a search for it. It saves your videos on line and then you can download them as a file to send.

Work submitted - Week 11.Week 12.
Complete 1 and 2 point perspectives using Publisher. 6 shapes of each.
There is a very involved video in Compass you can refer to and start, stop, pause etc. as you need to. I know you can do it! Please......if you cannot access Compass, let us know. Also, you need to make contact via WEBEX. There is VCD folder and you are all in there. If I do not get some work soon, parents will be notified. Even if it is not finished, you need to produce something. Last term's work is overdue now. |
| ||||

Week 13.Today we are working on city street in one point perspective and a two point perspective city (just like your A3 one you did with the ruler). Both done on an A4 Landscape page in Publisher. Remember to use the SHIFT key!
There will be a video in Week 13 on Compass. Before you start work - read ALL the instructions for this week.
Week 14.Week 15.One point perspective city street and two point perspective city done in Publisher.
(If completed, follow instructions to get publisher file into Photoshop and colour in for bonus marks.) |
|
Week 16.
|
Learning to use the set squares, t-square and drawing board..
This file is also in Compass in Week 15 attachments.
|
| ||
Go to the Paraline Drawing page.
This gets complicated but I know you guys can handle it. The most important thing is that you use the angles that are required. There will be videos in Compass for you to use.
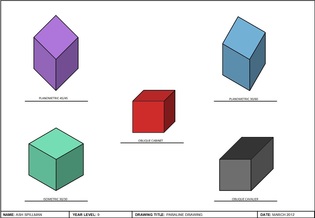
- Introduction to paraline drawing using Publisher - 6 shapes in Oblique and Isometric and 2 planometric.
- Cutout isometric cube Publisher to Photoshop and coloured.
Paraline drawings. Progress files to be submitted for comments via compass please.
I have created a video on the shapes. https://www.useloom.com/share/78b76f5c7f7e48ea809456ec2b777a31
- 6 shapes in Oblique and Isometric and 2 planometric.
- Cutout isometric cube - publisher to Photoshop and coloured.
Refer to the paraline drawing web page for assistance. Everything you need is on one of my web pages somewhere so look for it.
NOTE: if you have gaps between your lines in your shape, the Photoshop magic wand and fill will LEAK so everything must be joined up before you take it from Publisher to Photoshop.
- Paraline drawing examples in Publisher.
- NOT JUST CUBES.......more complicated shapes please.
- Computer cutout isometric cube.
- Colour the cutout cube in Photoshop. (Light/medium/dark surfaces and gradient fill.)
- Colour in your paraline drawings done in Photoshop. (Again, Light/Medium/Dark surfaces.)
NOTE: if you have gaps between your lines in your shape, the Photoshop magic wand and fill will LEAK so everything must be joined up before you take it from Publisher to Photoshop.
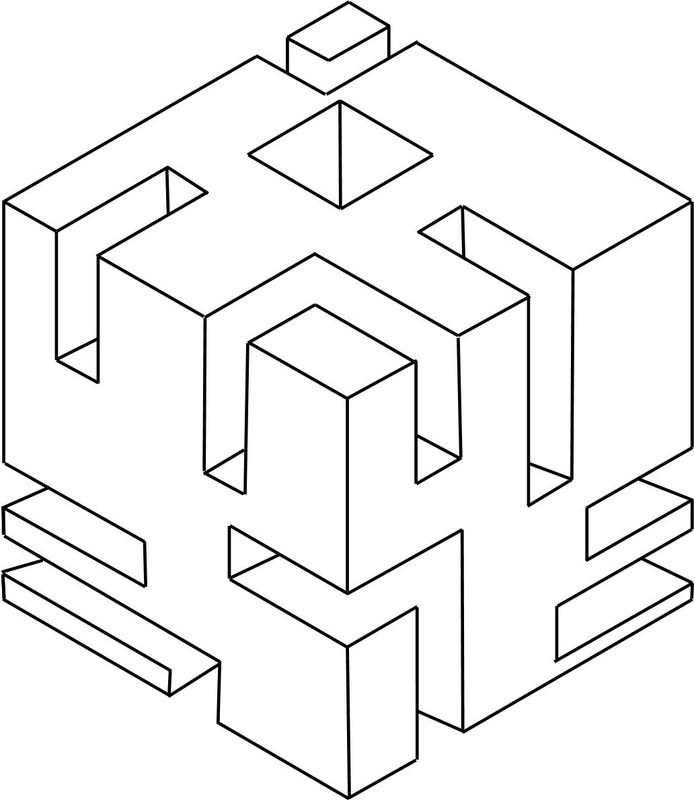  |
Here is a video that explains how to do the cutout Isometric cube. https://www.useloom.com/share/caa39430becd46248311870f67ec8be9
|
Week 17.
If you finish your Publisher paraline drawing,
- Catch up on any overdue work - BORDERS!!!!!! You will still be printing and sticking in work at a later date!
- Do an Isometric cutout cube in Publisher. It does not need borders/templates - just done on an A4 page. 100mm lines.
Week 18.
Welcome back!
Just a few things I need you to consider about the way we work post remote learning.
Just a few things I need you to consider about the way we work post remote learning.
- Use Sanitiser regularly - definitely when entering the classroom.
- Please respect social distancing - I will not be handling your computers or your materials to do personal demonstrations. Please do not invade my personal space. Minimise movement around the room.
- Please do not share equipment amongst yourselves.
- Until I sort the headphones, mice and webcams so they can be cleaned after use, they are not to be used.
- Keep your own equipment in your plastic pocket - again - no sharing.
- Keep your tables clean. You may be asked to wipe down tables and chairs occasionally.
- If you are not well - please stay home.
Wednesday Session 2.
2 point perspective - HB pencil, ruler, eraser.
There are examples of 2PP on the web page and a video in Term 2, week 3 on Compass.
2 point perspective - HB pencil, ruler, eraser.
There are examples of 2PP on the web page and a video in Term 2, week 3 on Compass.
Thursday 5&6
2 point perspective - HB pencil, ruler, eraser. City. Initials. Other work. A checklist is on its way.
There are examples of 2PP on the web page and a video in Term 2, week 3 on Compass.
2 point perspective - HB pencil, ruler, eraser. City. Initials. Other work. A checklist is on its way.
There are examples of 2PP on the web page and a video in Term 2, week 3 on Compass.
Week 19.
Rock and Roll......keep up the good work.
I have put check lists into the front of your folders so that you can have a look at what you need to do. It even has the page numbers listed!
You make the choice but do not waste time - some of you just need to stick in handouts and fineliner borders for a stamp and a tick, so let's get to it and finish up with some perspectives.
Lorelai, I have put a paraline drawing template and an example in your pocket folder - use the equipment and have a go at the paraline drawing examples. There is a spare template in the folder if you muck up. You can watch the video too.
Week 20.
Thursday Sessions 5&6.
- Over the holidays, your laptops will be re-imaged, therefore it is important that you move anything you need to save that may be on your C drive into your Network Folder.
- Check all the sub folders on C......Documents, pictures, videos etc. It will all be GONE if you do not!
- Email. I need you to make sure that you have your email address and more importantly we need to know it works and that you can access it.

|

Well done - the last week of term........let's make it count!
Refer to your check list.....and just keep swimming! |
End of Term 3, 2020.
|
|
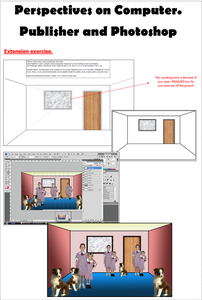
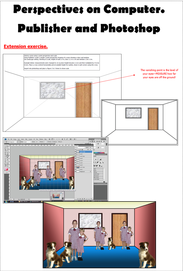
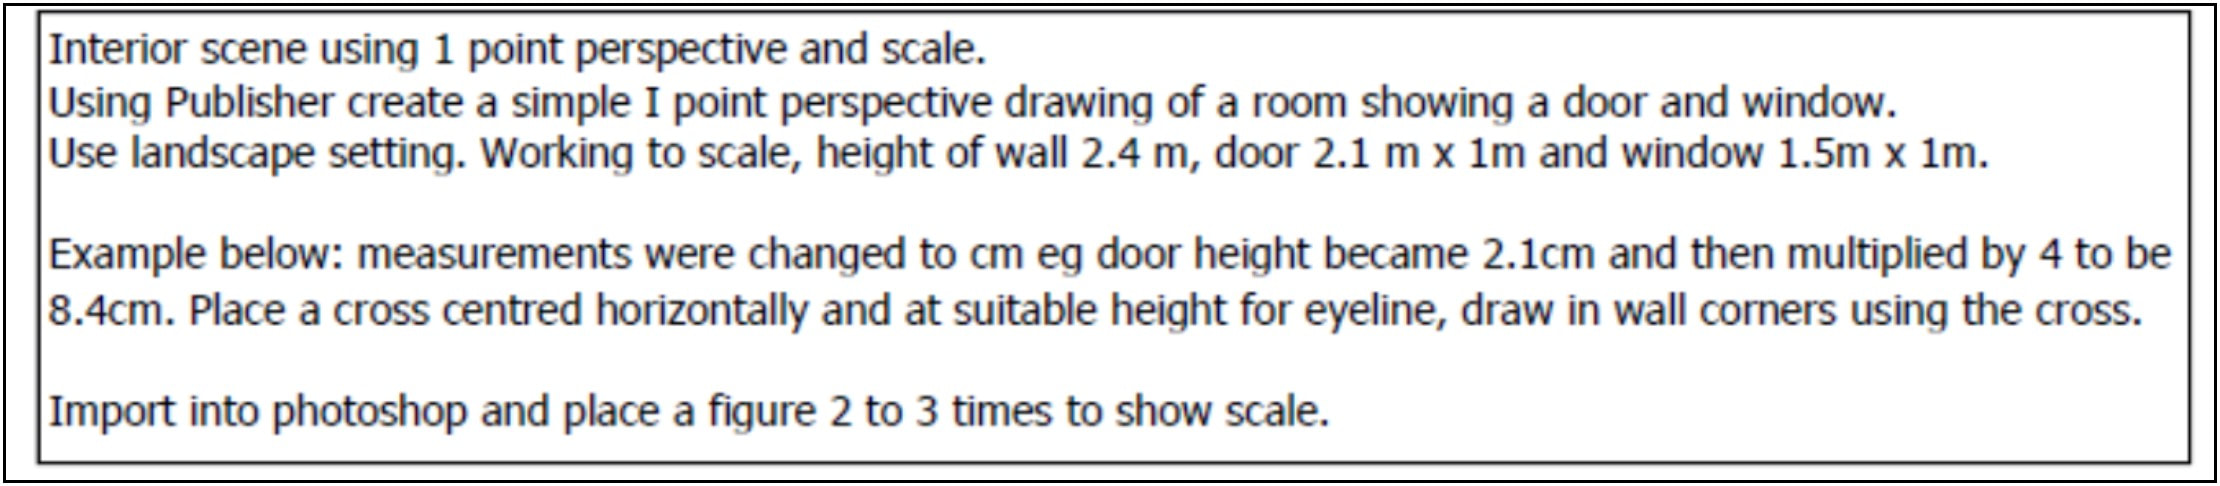
Demonstration and follow along:
One Point Perspective room with digital photo completed in double session today. Must look correct! This is the last perspective work we are doing! Everything up to and including page 20 should be completed and presented in your book. When you have read all the instructions for today, you are to move up to the front tables with your laptop and your book open. Open a new page in Publisher - A4 landscape then stand up and walk over to the tape measure on the door and with your nose against the tape measure, determine where your eyeline is and take note of the measurement. Remember it! Mine is 160cm.
Return to your seat and get ready to look and listen and follow along. |
When you have read all the above, open the calculator on your laptop. Stand up and say "I am ready" then sit down again.
Paraline drawing involves you knowing and understanding many different 'rules' to complete your drawing tasks. You should constantly refer to the page to ensure you are doing it correctly.
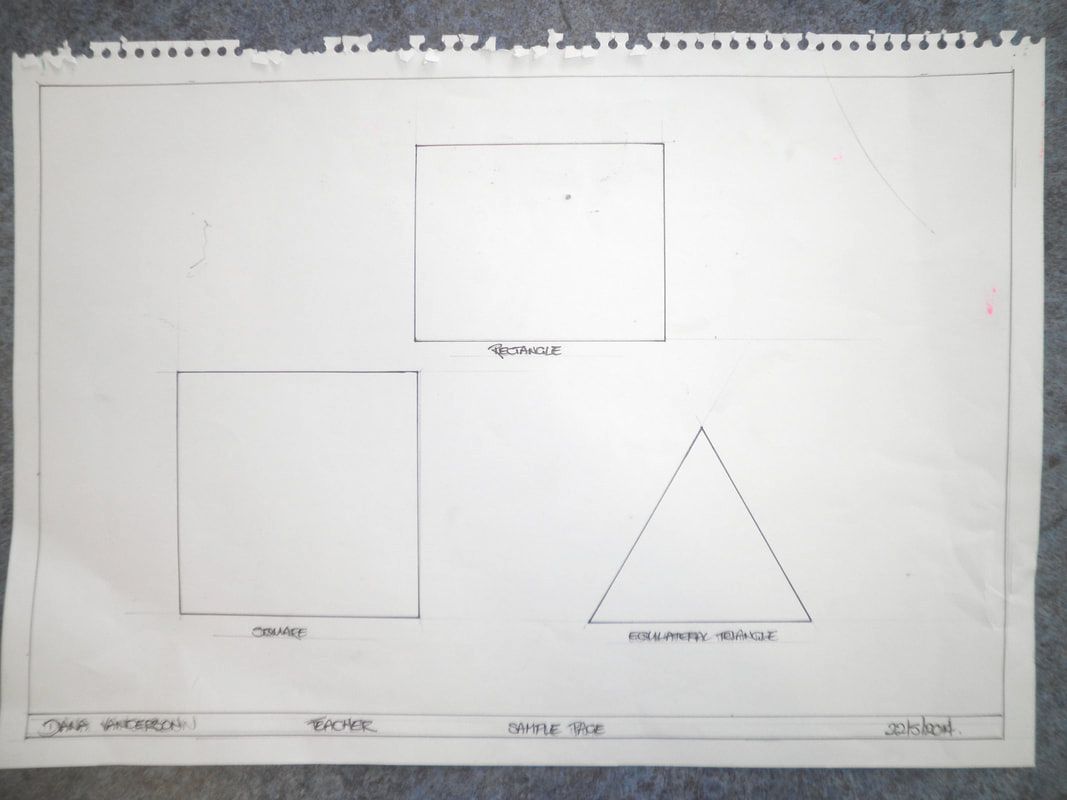
Drawing board, t-square and set squares! Basic introduction. Refer to page 3 of your workbook.
***IT IS REALLY IMPORTANT THAT YOU WORK VERY LIGHTLY WITH HB PENCIL AGAIN OR YOUR PAGE WILL GET MESSY AND DIRTY AND I WOULD HATE TO HAVE TO ASK YOU TO DO YOUR WORK AGAIN!
***IT IS REALLY IMPORTANT THAT YOU WORK VERY LIGHTLY WITH HB PENCIL AGAIN OR YOUR PAGE WILL GET MESSY AND DIRTY AND I WOULD HATE TO HAVE TO ASK YOU TO DO YOUR WORK AGAIN!
Wednesday:
- Finish fineliner work on your practice sheet then add titles as per the example IN CAPITAL LETTERS!
- Rule a light line to write on about 10mm below each shape.
- Clean up your page by erasing any greylead or smudges - your page MUST be clean. If not, you may like to have another go.
The main thing about your practice is to remember that you MUST use the set square and T-square together! NO guessing and NO ruling to 'guess' your lines!
Measuring and working lightly with a HB is also important!
There is a video called Paraline drawing 2 with commentary in your network folder. Along with the information on the Paraline drawing page and what you have just seen, complete a paraline drawing sheet neatly! Note - it took me just under 10 minutes! But I am terrific.
Store in plastic pocket folder.
Store in plastic pocket folder.
Hopefully you will get this done today and we can do the Publisher version tomorrow in the double session.
This is reports week......they are a work in progress!
THE WORK MUST BE DONE TO PROVE YOU HAVE GAINED THE REQUIRED SKILLS!
THE WORK MUST BE DONE TO PROVE YOU HAVE GAINED THE REQUIRED SKILLS!
Prints to collect - if I did not print it either I could not find it or it is not finished.
PLEASE REMOVE THINGS FROM YOUR TO BE PRINTED FOLDER IF THEY HAVE BEEN PRINTED! ANYTHING THAT IS A4 IS FOR YOU TO PRINT YOURSELVES!
PLEASE REMOVE THINGS FROM YOUR TO BE PRINTED FOLDER IF THEY HAVE BEEN PRINTED! ANYTHING THAT IS A4 IS FOR YOU TO PRINT YOURSELVES!
It is not too late for me to add some extra comments to your reports so make sure you use the double session productively. You will need to be in the art room to access your books and the folder as well as drawing boards etc.
Is everything I asked you to complete last week done? I can still add to reports!
- Ensure anything that is A3 is in a to be printed folder AND LET ME KNOW. You can print A4 yourselves for page 24 - just make sure the shapes are in towards the centre of the image so you can trim the 3 pages to fit inside the border.
Please use the headphones when listening to videos!
Using Loom, make an instructional video on how to transfer a file to Photoshop and begin to colour in. Up to the stage where you go Image-Mode-RGB colour. You may have to find somewhere quiet to sit. Include sound please!
End of term. |
|
Ignore what is below this line.
| da_vinci_van_gogh_perspectives.pub |
Checklist - just in case you did not read further up!
- Complete and print front page - glue in book. Border.
- Make sure you have completed everything on page 7.
- Have all pages stuck in with borders. RULED!!!!
- Complete research - instructions on page 8 and examples above. Stick on page 10.
- Complete A3 poster of definitions. Place in a 'to be printed folder' that is easy to find.
- Make sure you have opened and looked at all the links on this page!
| logos_and_labels_student.pub |
Task 4 - Week 8
|
PAGE 15:
These files have been provided. However, if you do not do them right, you may download another copy of them here and complete them.
|
PAGE 12:
Amongst many things Visual Communication Design, there are many perspective examples and resources on my pinterest page.
A really comprehensive website with excellent information about perspective drawing.
PAGE 13:
PAGE 14:
This is an EXTENSION ACTIVITY that you should try if you are up to date with everything else or have some spare time. Feel free to use the digital camera. NO BORROWED IMAGES!
Final piece not to be stuck in Visual Diary. | ||||||
PAGE 17:
Computer perspectives - 1 point and 2 point.
Week 8
Tuesday - Week 8.
Demonstration and introduction to perspectives. Begin perspectives tasks - page 12.
Complete the building and the city for page 15.
Complete page 16.
Thursday - Week 8. (And Week 9)
A3 sheets - one point perspective initials & 2 point perspective city.
Demonstration and introduction to perspectives. Begin perspectives tasks - page 12.
Complete the building and the city for page 15.
Complete page 16.
Thursday - Week 8. (And Week 9)
A3 sheets - one point perspective initials & 2 point perspective city.
Week 9
Major Tasks: End of term 1.
Week 9 - last week of term.
Term 2.
Week 10
Working on the A3 worksheets. Nothing else! If you are behind, it is now homework and needs to be done in your own time!
Remember to read the instructions on the page, refer to the web page and look at the examples as well as the completed examples provided! Do not fineliner until ALL greylead is done! Use colour pencil to demonstrate a knowledge of HOW colour works!
To be completed by the end of the double session on Thursday 14th April!
Demonstration on using Publisher to complete perspective drawings. Refer to page 13 and examples provided.
PAGE 17:
One point and two point perspectives done on computer (2xA4 pages).
Can be printed via the desktop or the blue laptop - ask me for a log in.
10mm border - measured and ruled.
Completed by end of session 6, Thursday 21st April.
Can be printed via the desktop or the blue laptop - ask me for a log in.
10mm border - measured and ruled.
Completed by end of session 6, Thursday 21st April.

|
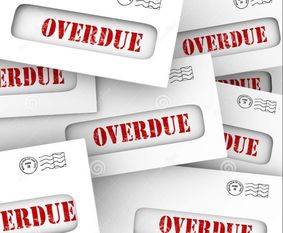
Overdue work is not going to go away.
Please come and see me if there is something you do not understand about getting the overdue work that you have been reminded of continuously that was to be completed by the end of the double session on Thursday 14th April! |
Things you should do on a regular basis
- Open computer and look at this website!
- Check your set squares - each person had 2 different ones in their plastic pockets - I found too many without owners of late. You are responsible for looking after this equipment.
- Open your book and look at your checklists and notes - do not let yourself fall behind! If it is not stamped, it is not complete and overdue.
- Work on completing your 1 and 2 point perspectives in Publisher, print and glue in on page 17.
- Those with overdue work show me your work, signed notes and get them marked off.
- Ensure that you have a ruler for Thursday's class - a set square will not do the job.
Notes in diaries:
|
|
Websites
Files
|
Files | ||
