In levels 9 and 10, students build on their awareness of how designers communicate ideas with a specific purpose, to a targeted audience, using different visual communication design practices and viewpoints. They refine their personal aesthetic through their development of knowledge, understanding and skills in making and responding to visual communications.
Students critically reflect on the contribution of visual communication designers to various historical and cultural design movements. They adapt ideas and practices from selected designers and use them to inform their own use of aesthetics when producing a range of visual communications.
Students extend their understanding of safe practices and their understanding of the roles of visual communication designers and their audience in sustainability practices. Students choose to use sustainable materials, media, methods and technologies when making visual communications.
Levels 9 and 10 Content Descriptions
Explore and Represent Ideas
Within visual communication fields, students develop briefs and visualise, generate and develop ideas in response to audience needs. They evaluate, reflect on, refine and justify their decisions and aesthetic choices.
Students demonstrate their use of visual communication design skills, techniques, conventions and processes in a range of design fields. They manipulate design elements and design principles, materials, methods, media and technologies to realise their concepts and ideas for specific purposes, audiences and needs.
Students critically reflect on the contribution of visual communication designers to various historical and cultural design movements. They adapt ideas and practices from selected designers and use them to inform their own use of aesthetics when producing a range of visual communications.
Students extend their understanding of safe practices and their understanding of the roles of visual communication designers and their audience in sustainability practices. Students choose to use sustainable materials, media, methods and technologies when making visual communications.
Levels 9 and 10 Content Descriptions
Explore and Represent Ideas
- Develop and present visual communications that demonstrate the application of methods, materials, media, design elements and design principles that meet the requirements of a specific brief and target audience (VCAVCDE006)
- Generate, develop and refine visual communication presentations in response to the brief (VCAVCDE007)
- Use manual and digital drawing methods to create visual communications in the specific design fields of Environmental, Industrial and Communication Design(VCAVCDV008)
- Develop a brief that identifies a specific audience and needs, and present visual communications that meet the brief (VCAVCDP009)
- Analyse and evaluate the factors that influence design decisions in a range of visual communications from different historical, social and cultural contexts(VCAVCDR010)
- Analyse and evaluate the use of methods, media, materials, design elements and design principles in visual communications from different historical, social and cultural contexts (VCAVCDR011)
Within visual communication fields, students develop briefs and visualise, generate and develop ideas in response to audience needs. They evaluate, reflect on, refine and justify their decisions and aesthetic choices.
Students demonstrate their use of visual communication design skills, techniques, conventions and processes in a range of design fields. They manipulate design elements and design principles, materials, methods, media and technologies to realise their concepts and ideas for specific purposes, audiences and needs.
Helpful files for all year levels
|
| ||||||||||||
|
|
|
| ||||||||
|
         |
Year 9/10 Visual Communication
Your Visual Diary
Your Visual Diary should remain neat and organised at all times. Any work you do, must include trials and visual representation of the work you do, don't be afraid to print small images to clarify your thinking.
Place appropriate headings on your pages - Research.....Ideas......Things I like.........Refinement...........Trials.................etc........ Use the computer and try and create a theme within your diary. This could be as simple as printing headings on coloured paper, using a specific font, exploring upper and lowercase.....etc. Your Visual Diary should resemble a journal of your learning experiences over the semester and is not confined to the classroom.
You should also use your computer as a Visual Diary. Then they can be edited and printed if necessary to include in your reference and developmental work. Tutorials for specific computer programs are excellent if kept this way.
It is important that you source any images you find and use in your visual diary. If you use Google Images, please make sure you click through to the website and get the reference for the webpage.
Be original, explore, develop and refine your work constantly. All design goes through multiple stages of refinement to get to a final product. These refinements are all part of your assessment.
2017
Week 1.
|
|
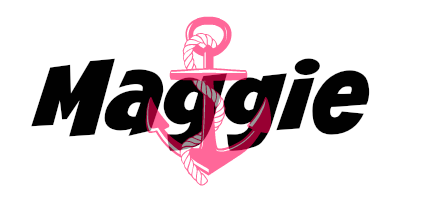
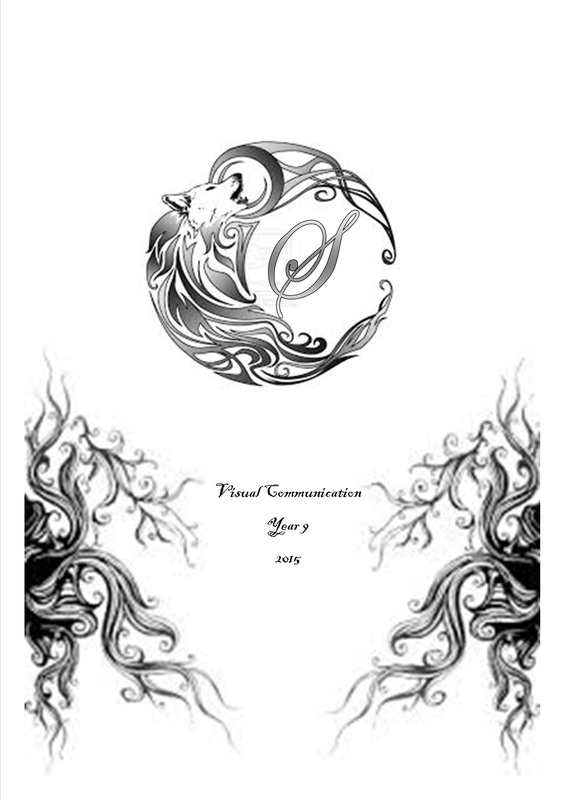
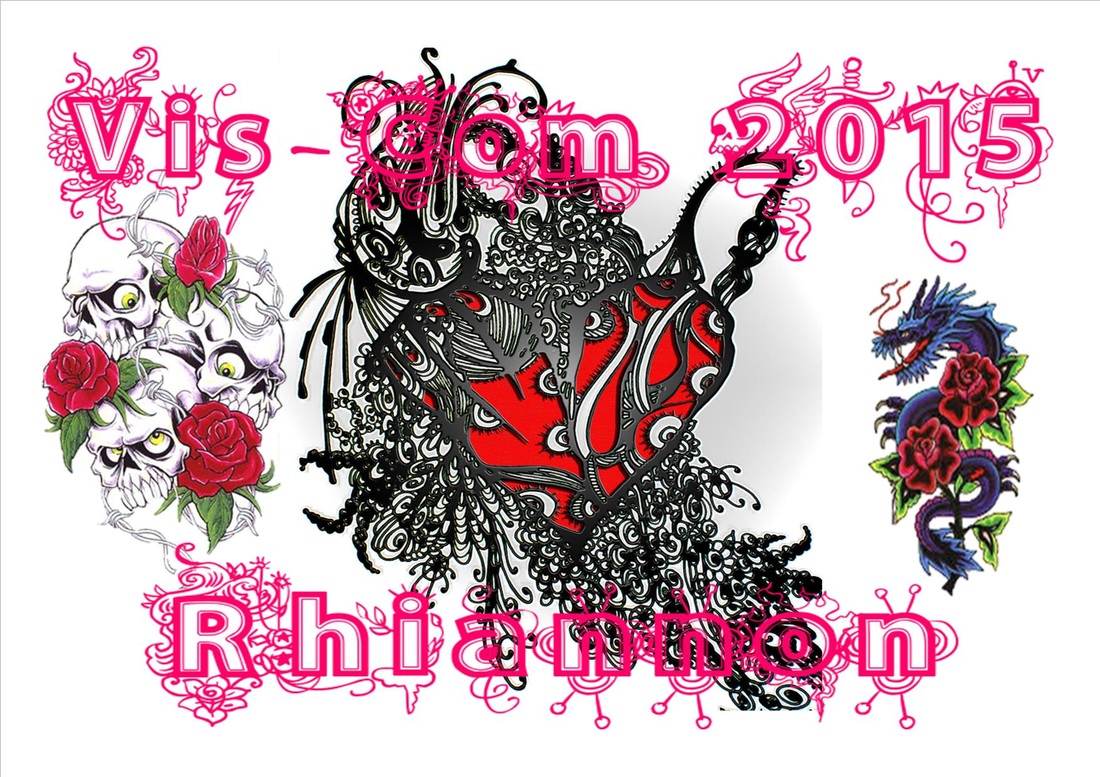
Visual Diary Front Page
|
Week 2.
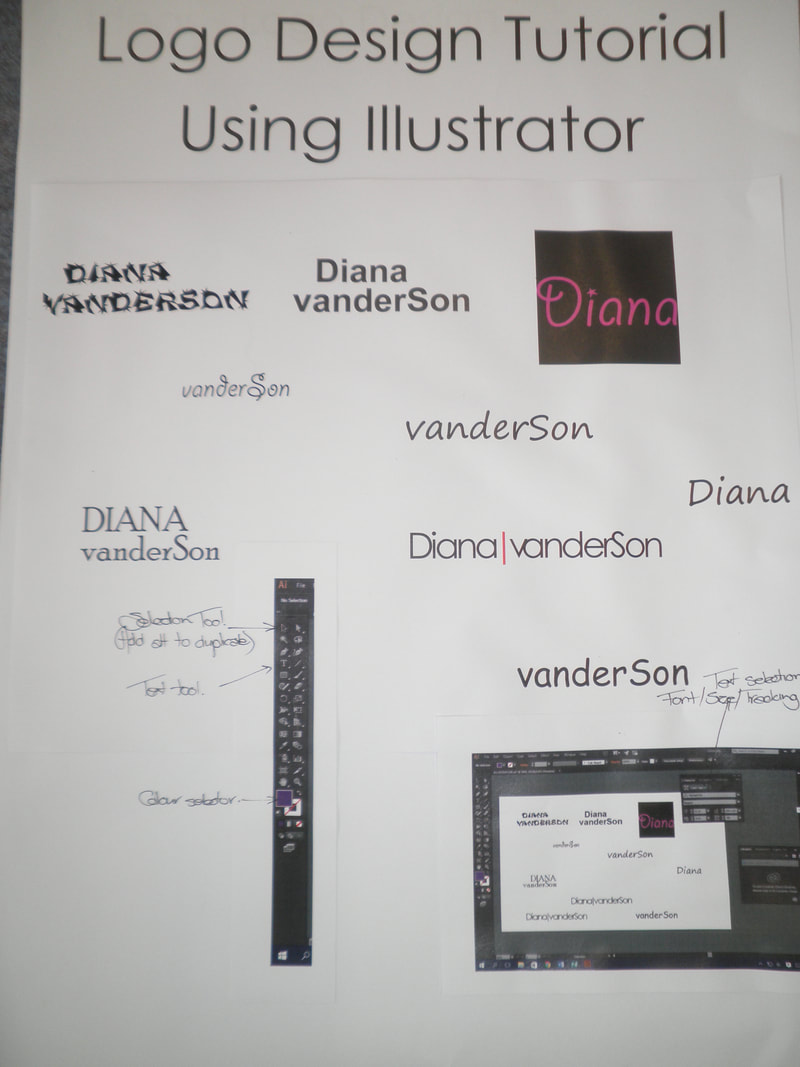
- Continue Illustrator tutorial video from last week to familiarise yourself with text and creating in Illustrator. Save and print the trials page.
- Once you have finalised your logo, it will form the basis for the page headings in your visual diary.
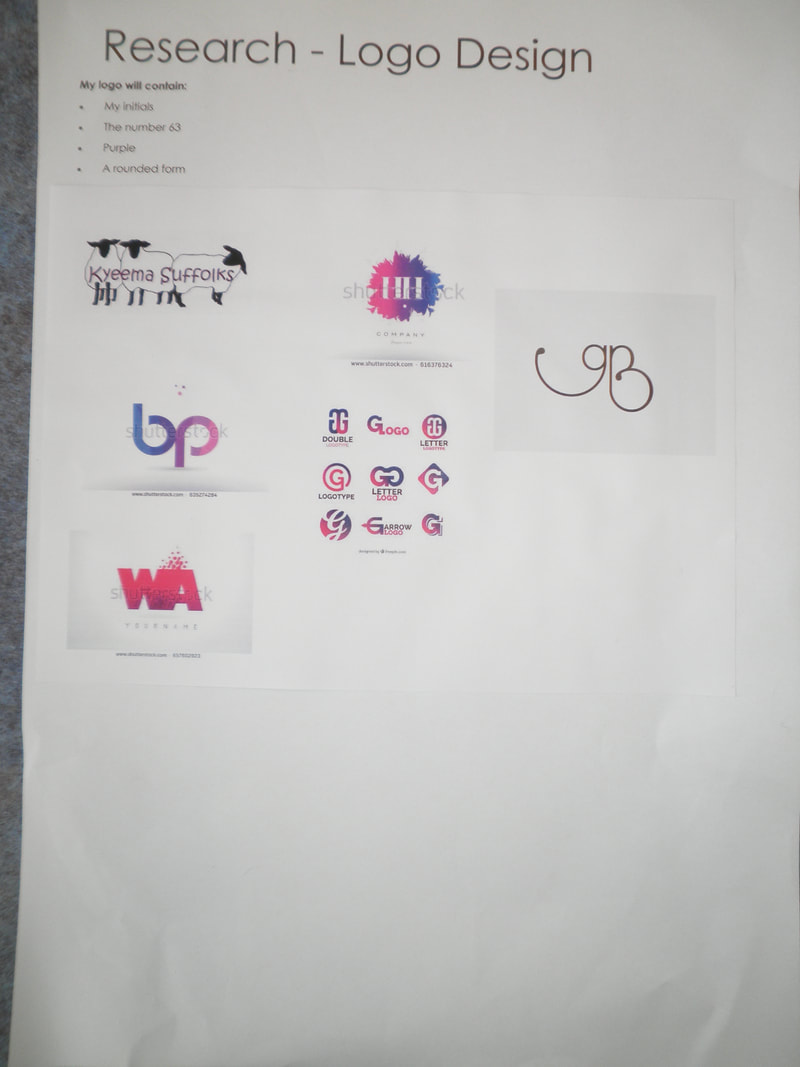
- Print and present your research page in your visual diary. Include a page heading.
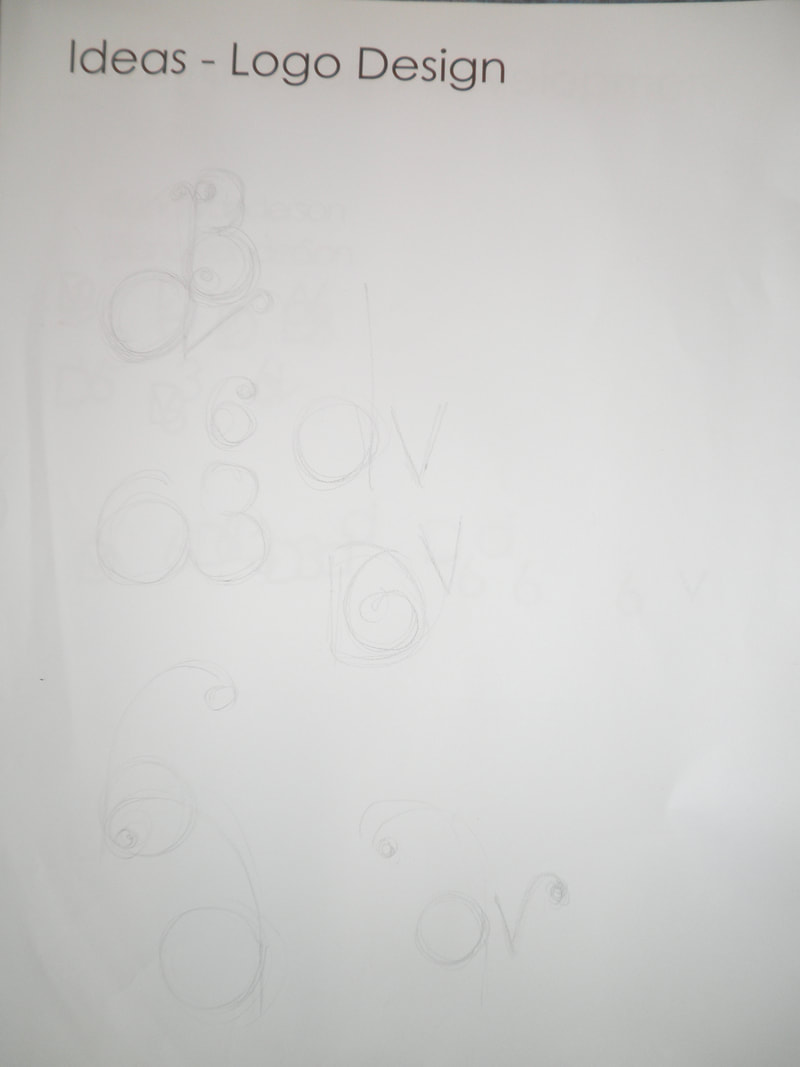
- Create a heading "Ideas" and do a page of quick SKETCHES that will set the basis for your own logo.
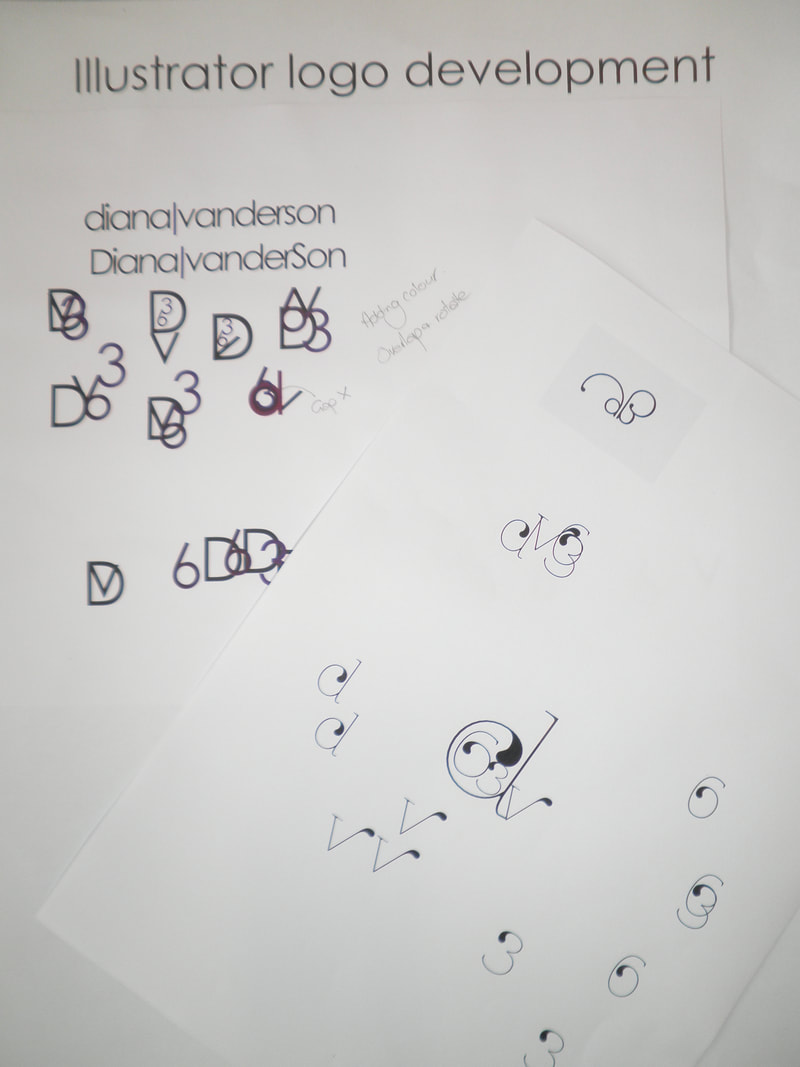
- Using Illustrator - create your preferred logo. Do a few small variations of the design and pick the best.
Week 3.
- Finalise your logo design from your trials and your sketches.
- Ensure you have all the elements in your logo that you first intended. Be creative.
- Print a large version of your logo to place on your front page. Include some other text combinations to add interest to the page.
- Finish all 5 pages (except for the printing) on Thursday.
See sample pages below.

Week 4.
The Design Brief.
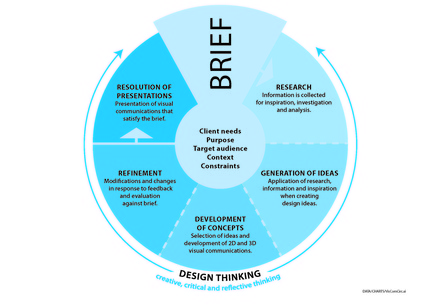
A design brief is a written document for a design project developed by a person or team (the 'designer' or 'design team') in consultation with the 'client'. They outline the deliverables and scope of the project including any products or works (function and aesthetics), timing and budget.
You are to write up a design brief for a new product - Toast Flavoured Ice Cream produced by the Totally Different Ice Cream Company.
- You need to determine the audience.
- You need to design a logo for the company and incorporate this into a simple advertisement for the Toast Flavoured ice cream.
- There is no cost limit.
How to write design brief: https://designschool.canva.com/blog/effective-design-brief/

|
This task will take up at least 6 pages in your workbook - each with the headings as determined by the diagram presented.
Use the internet to research and develop ideas - don't forget to reference and annotate your work.
|
For some excellent tutorial videos go to: https://www.youtube.com/channel/UCoeJKtPJLoIBqWq4o8TDLpA
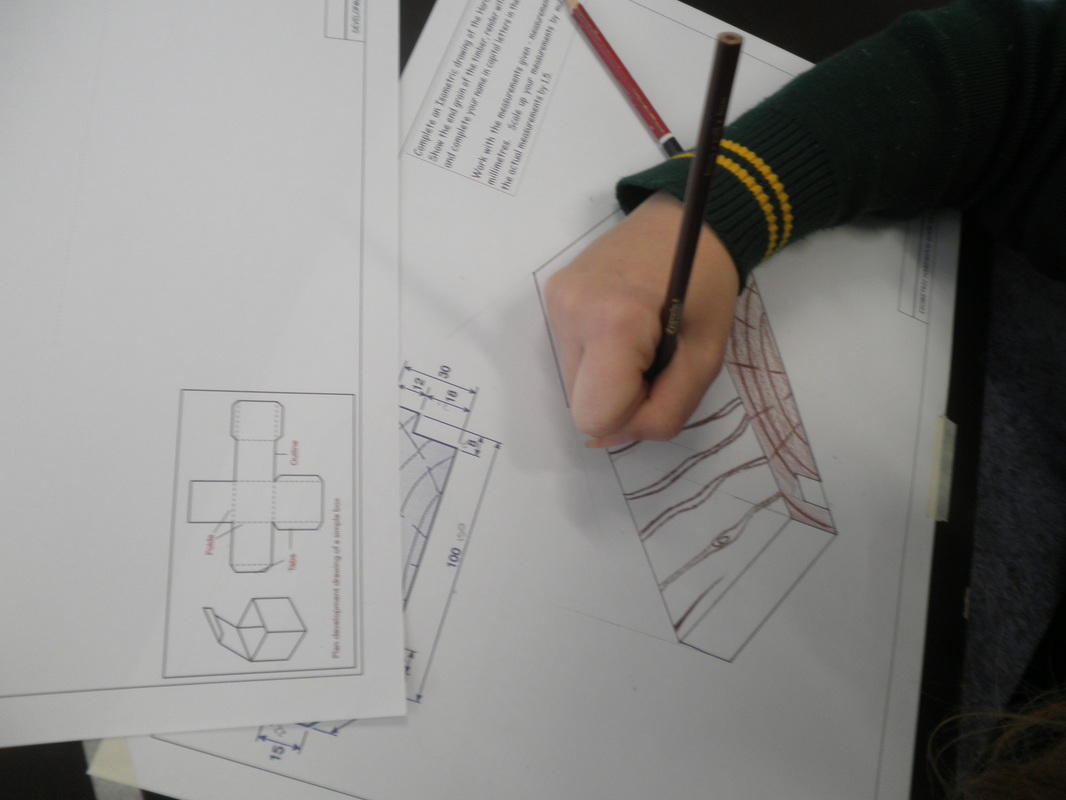
Paraline Drawing.
|
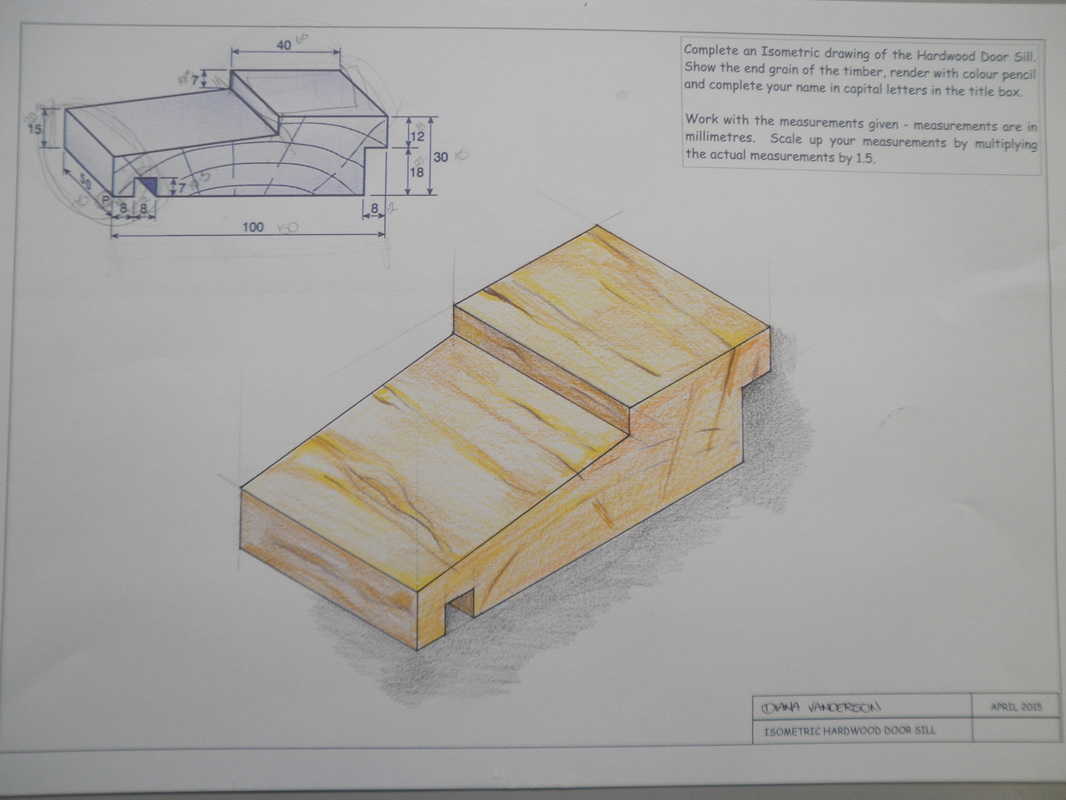
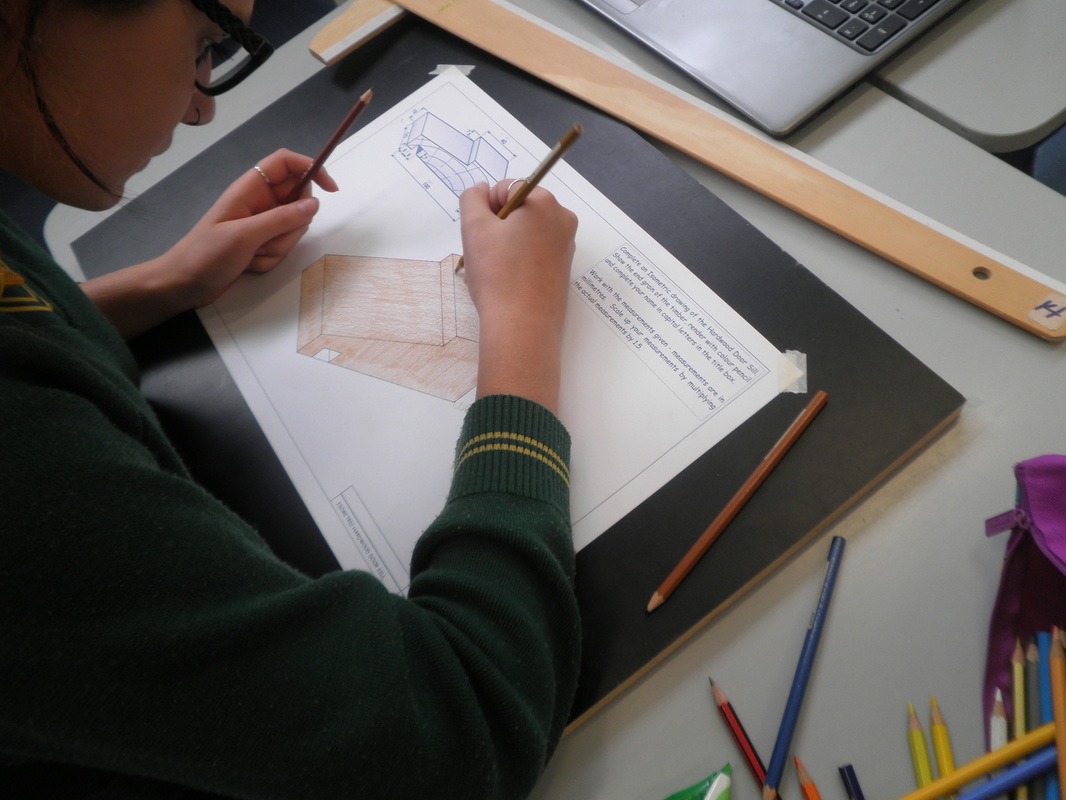
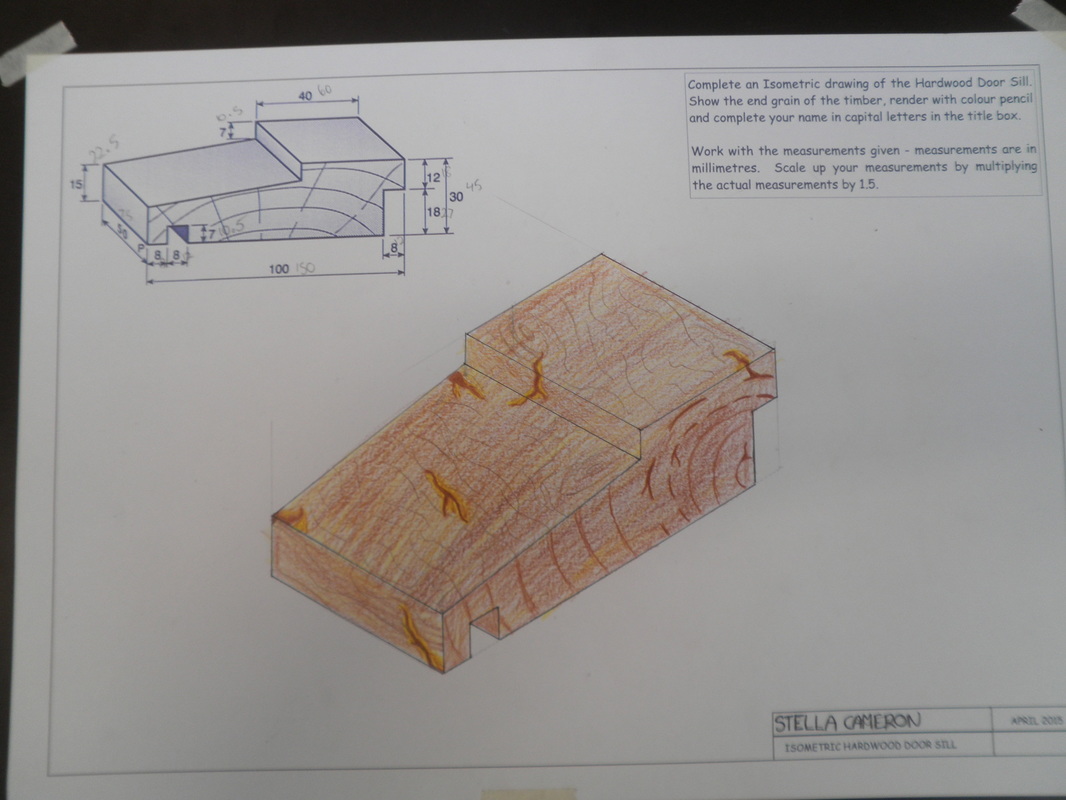
Complete and render the isometric drawing of the wooden door sill.
|
On individual A3 pages in Publisher and with headings, collect 6 examples with references of the following:
|
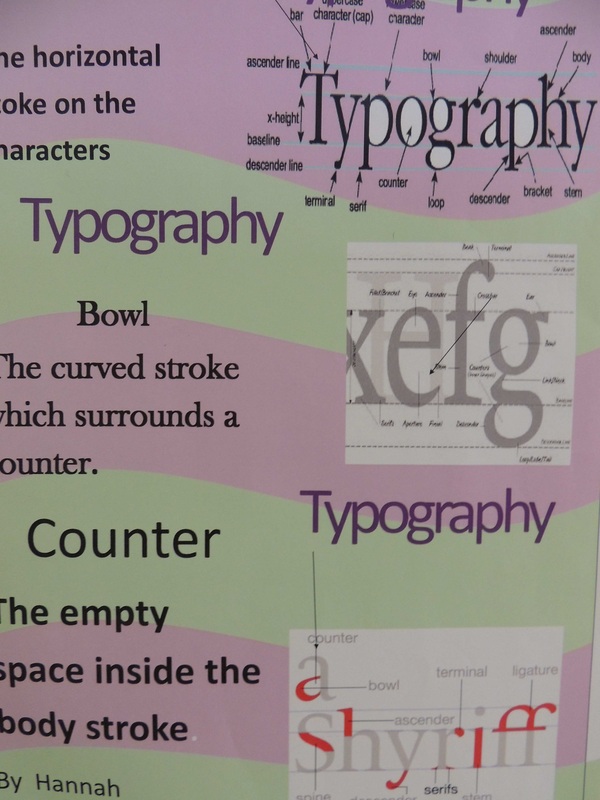
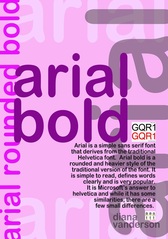
Explore a Font (VCAVCDP009) (VCAVCDE006)
|
Exploring a Font
Create an A3 poster that uses layering and design considerations to demonstrate the characteristics of a particular font you find appealing. View the file attached for instructions.
|
| ||
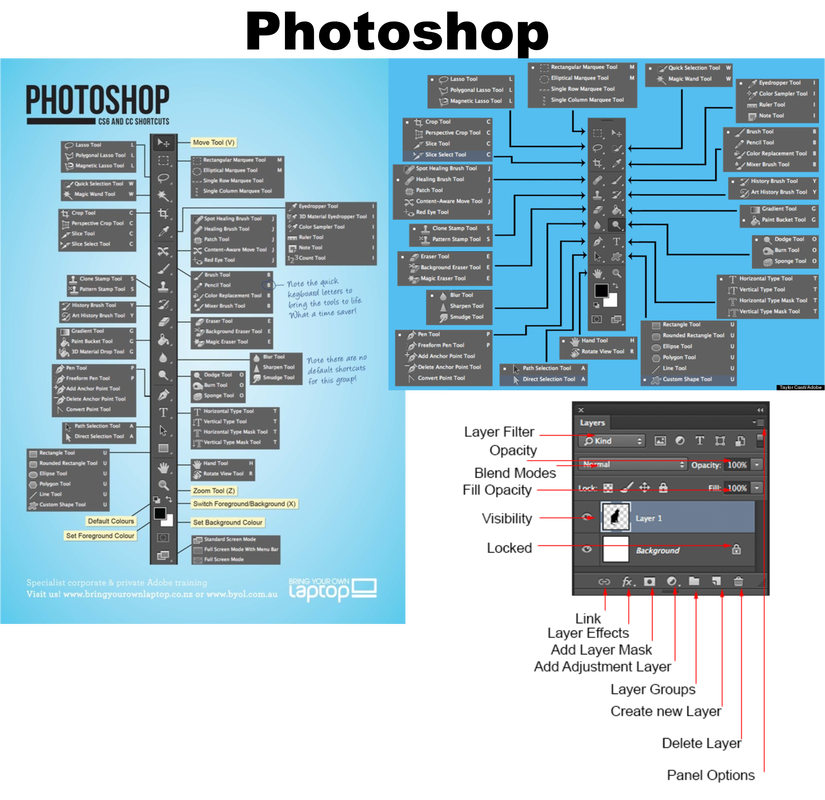
Layers and Photos (VCAVCDP009)
| quotes_and_a_web_address_to_get_you_started.pdf |
|

|
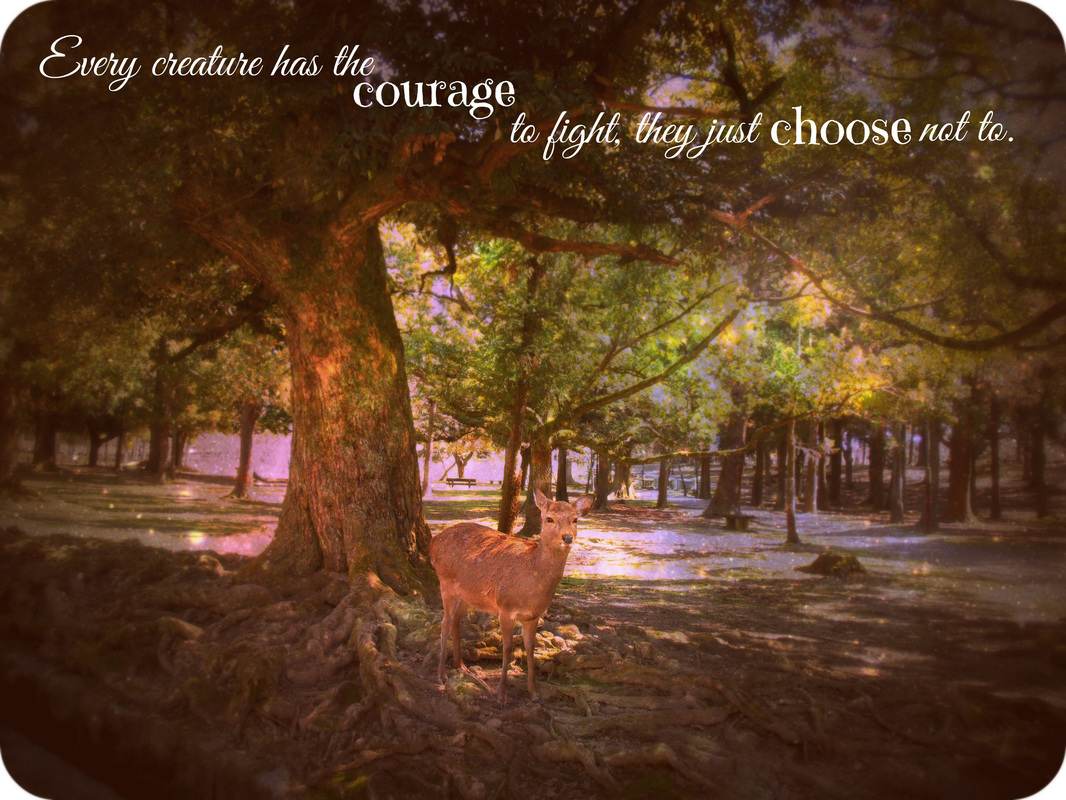 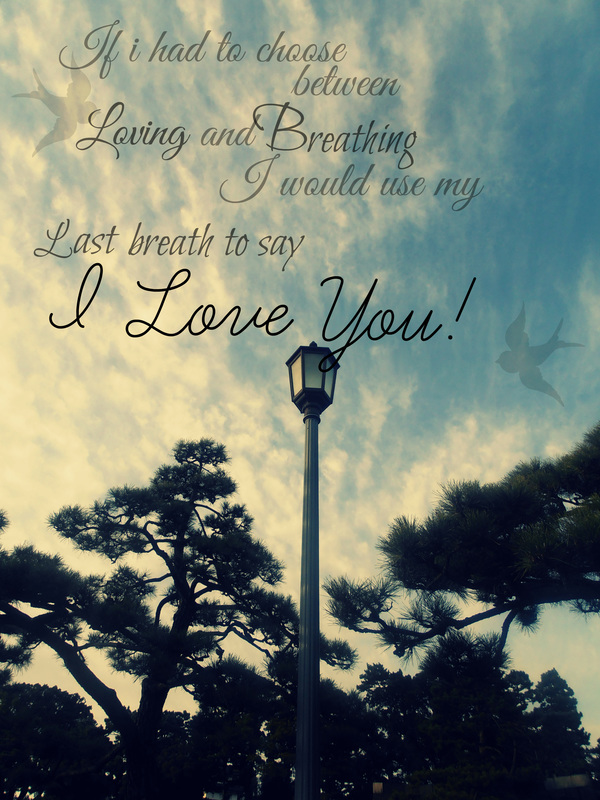      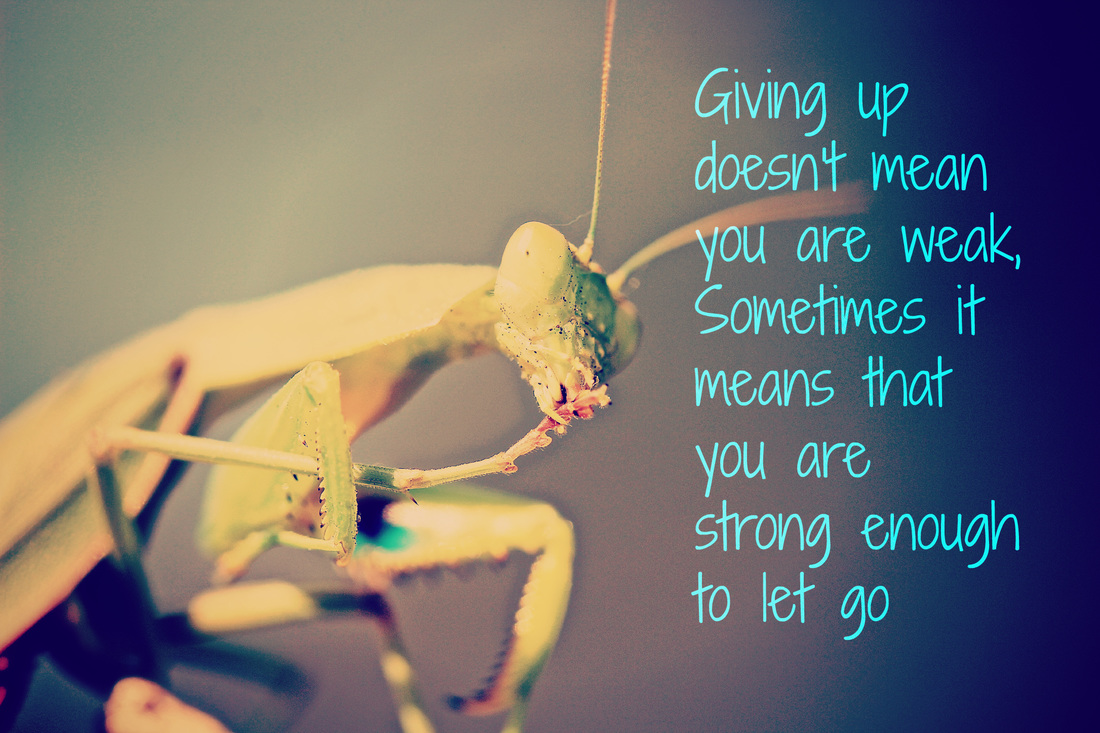 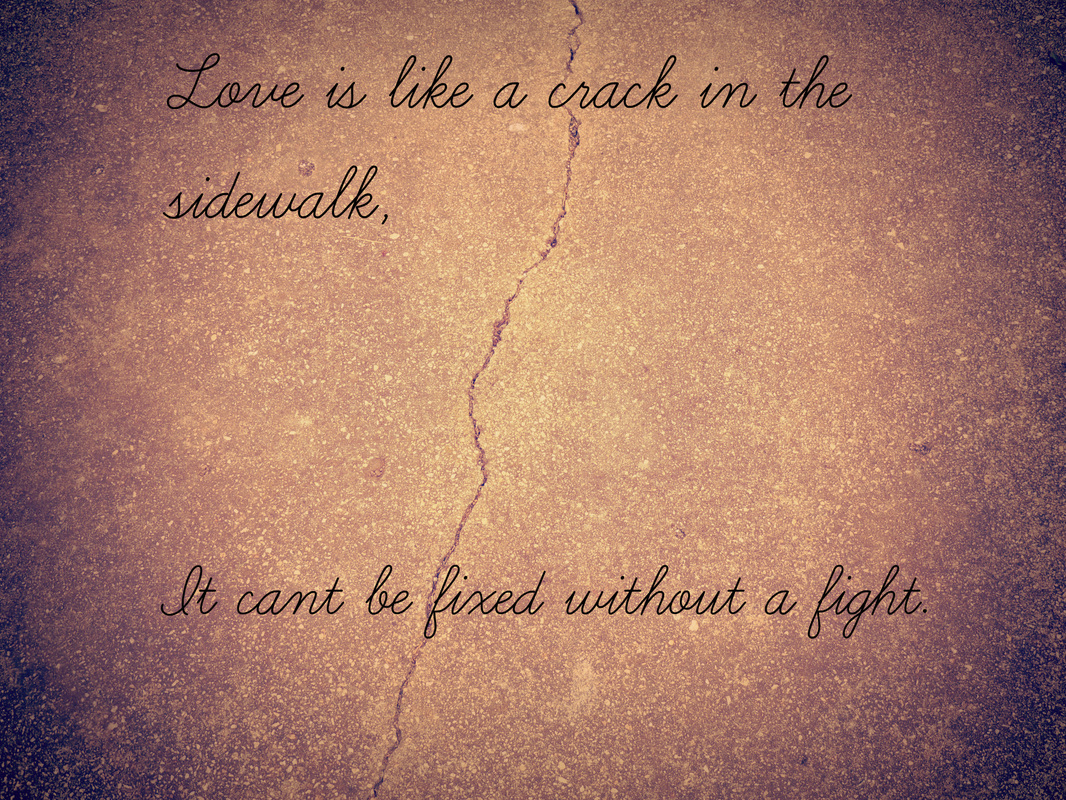 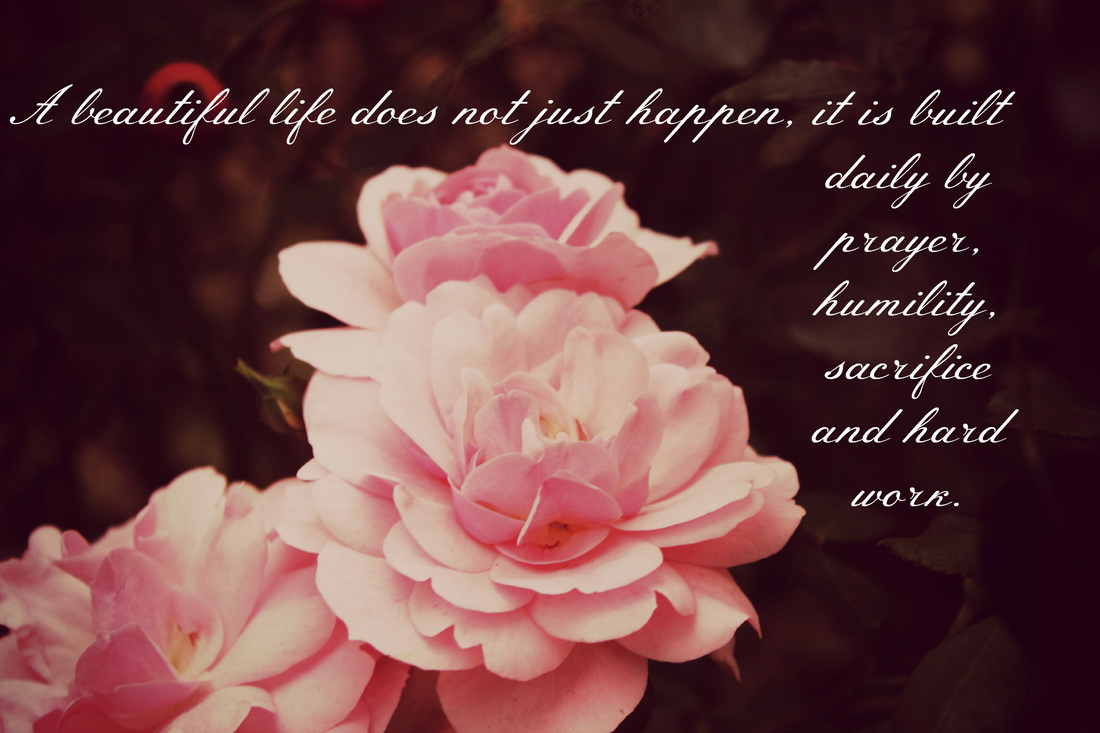 |

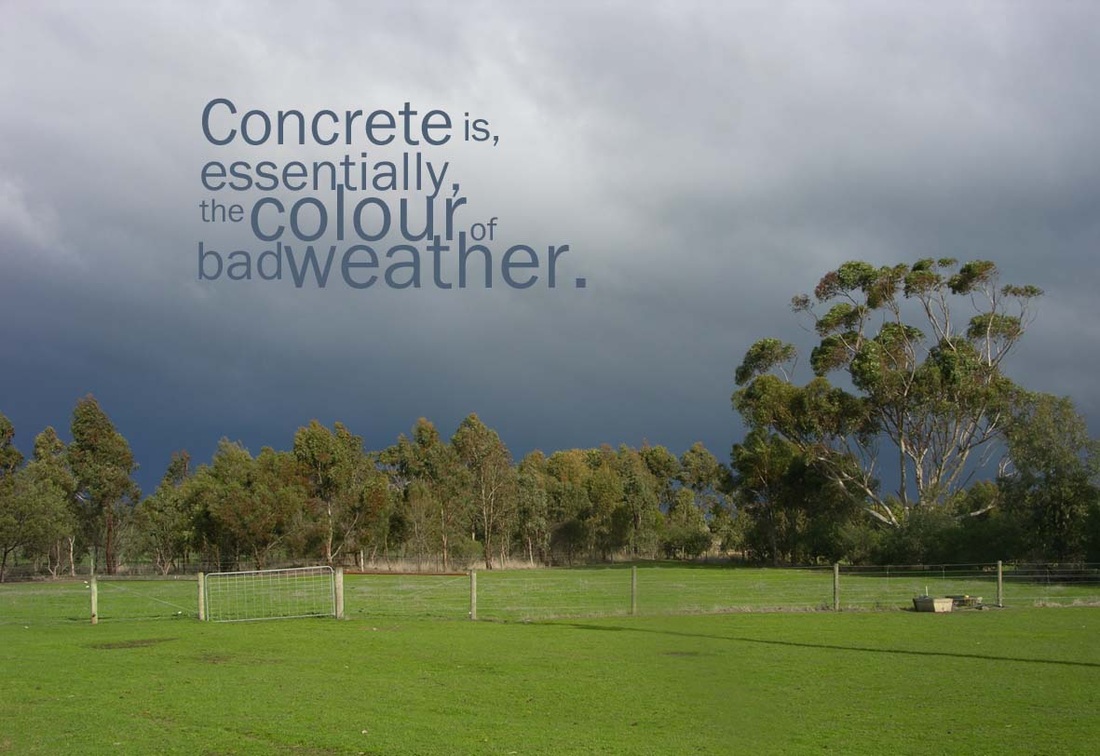
Photograph by Stella Cameron, editing by me.
|
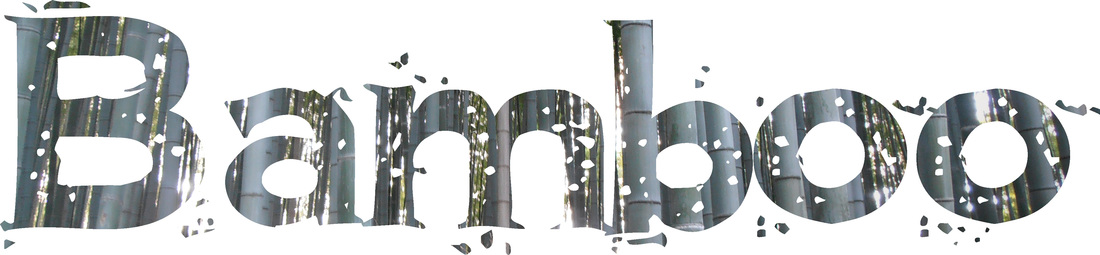
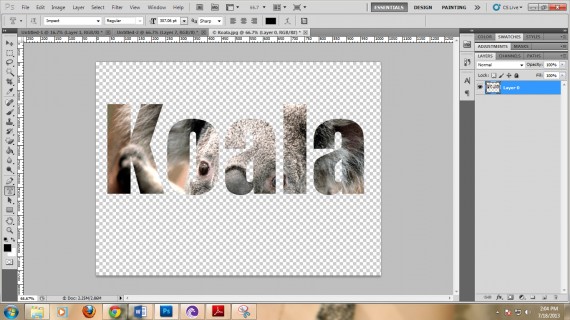
Image and Type
Using images you have taken and layering text, work through the Working with Type tutorial to demonstrate working with layers and design considerations you have made along the way. You must demonstrate the consideration of the following in your design:
|
|
Previous topics.
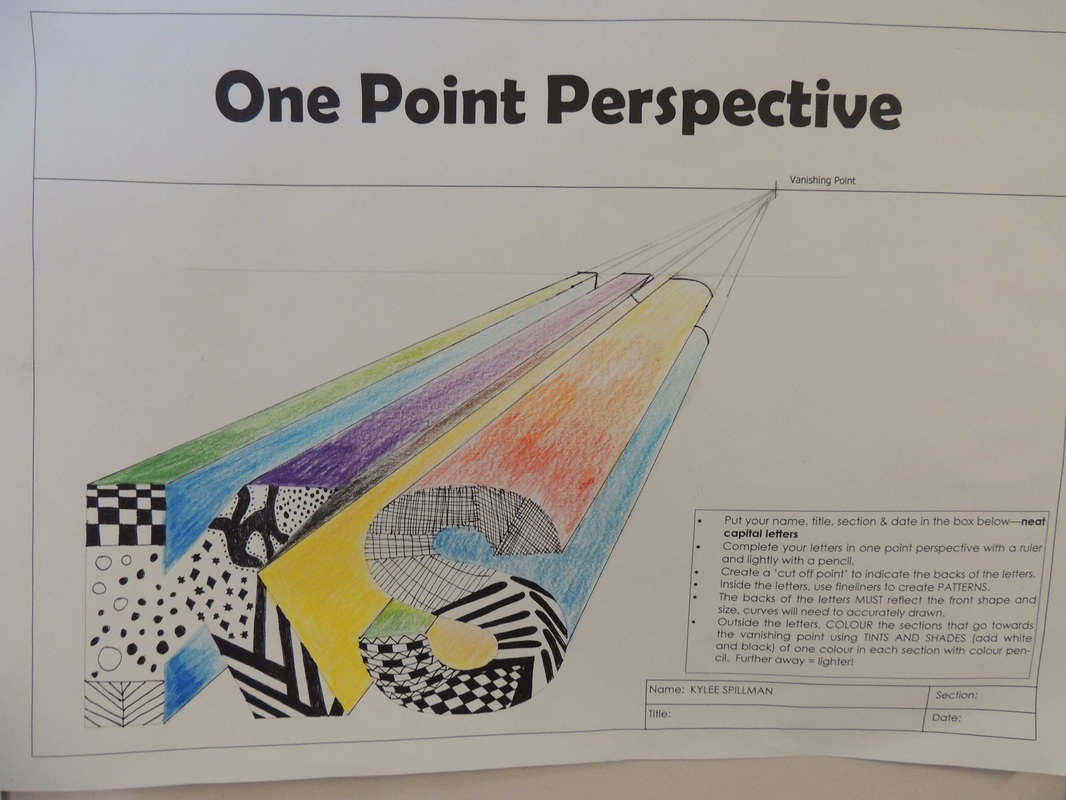
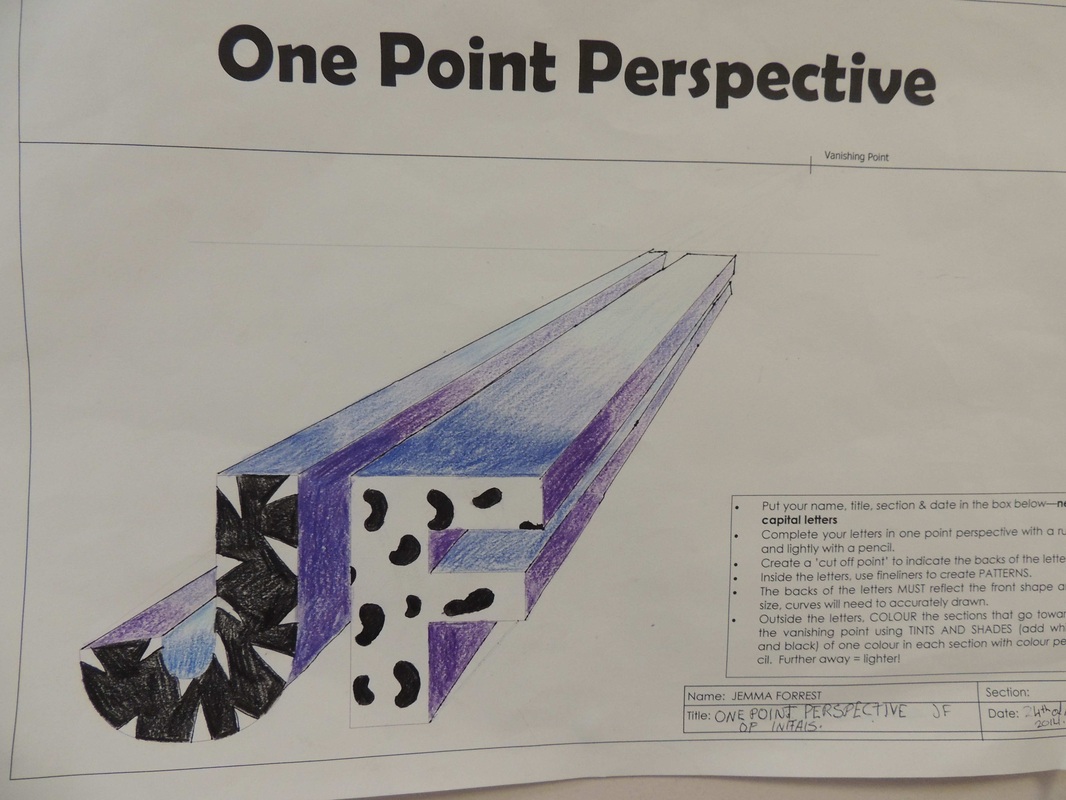
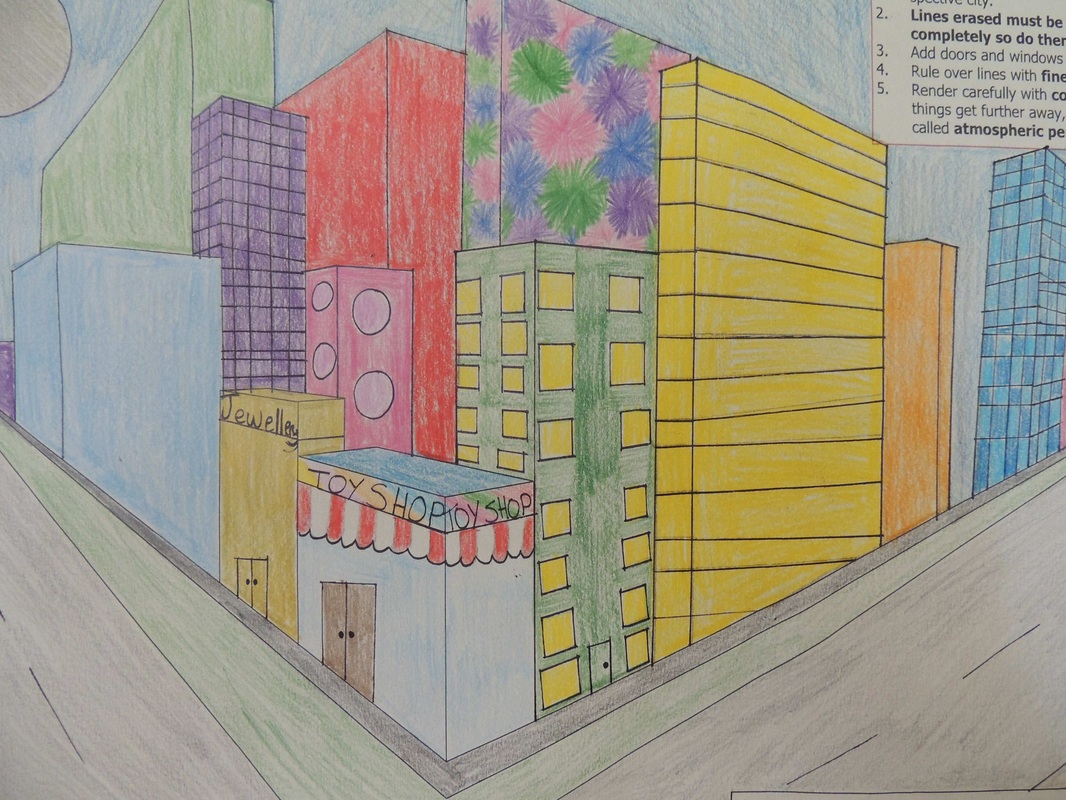
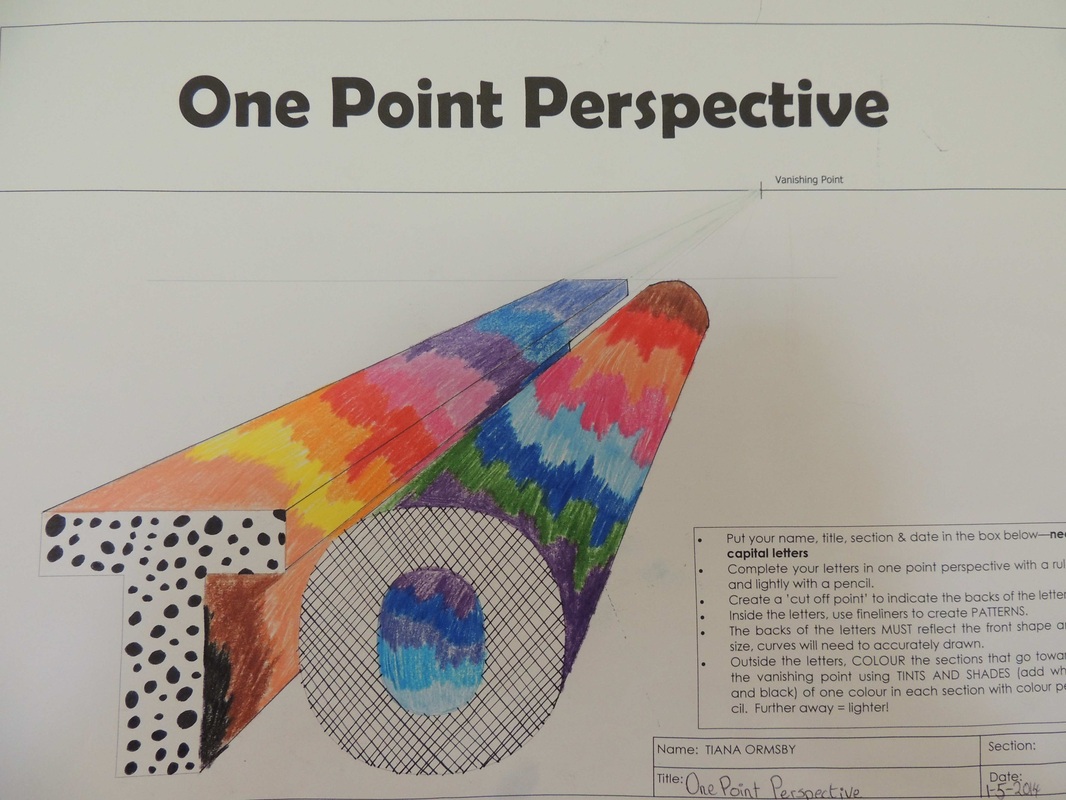
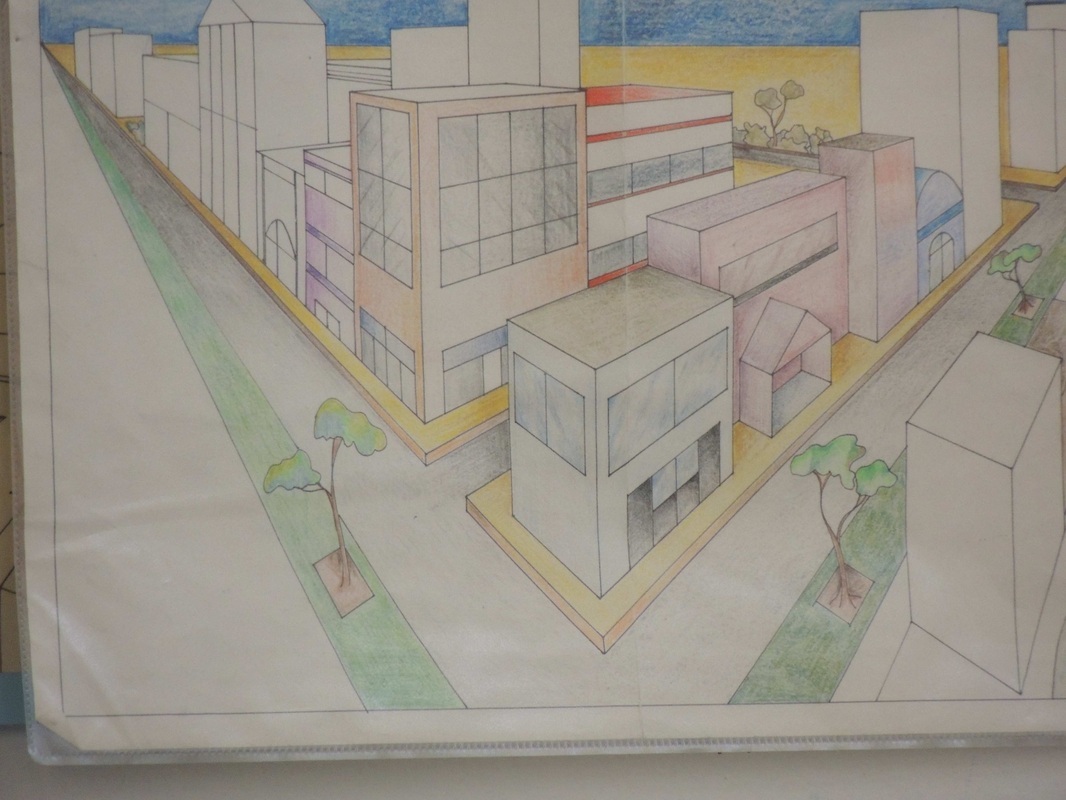
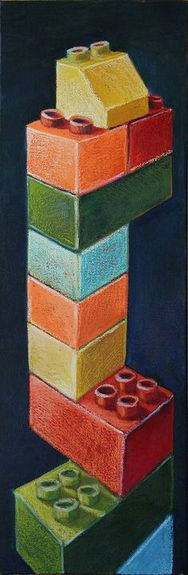
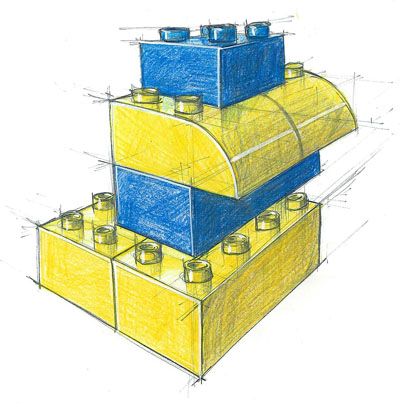
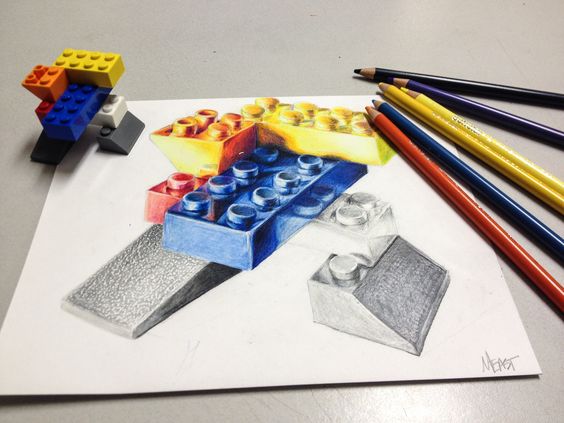
Perspective drawing.
(VCAVCDE006) (VCAVCDE007)2 point perspective drawing with lego.
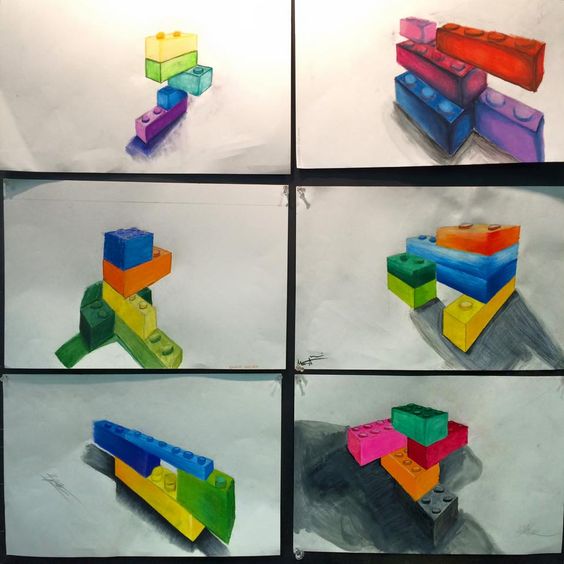
Practice Perspective Drawing:
Goals: Students will learn about, know the difference between, and be able to execute both one and two point perspective. Students will build a structure out of legos. Each student will also photograph and draw using two point perspective. Students will also focus on composition and color value. Vocabulary: Perspective: Horizon Line: Vanishing Point: Composition: Form: Space: Value: Contrast: Procedure: 1.) Build an interesting structure using Legos. 2.) Once you have developed the structure, do some quick sketches of the structure. 3.) Take some photos of your structures. Download them to your network folder. 4.) Develop your drawings into more refined pieces. Practice drawing from a photo using what you know about two point perspective. Don't spend a lot of time on detail at this point. Practice getting the perspective accurate. Use the entire page. Use a ruler to get your lines as straight as possible. |
|
|
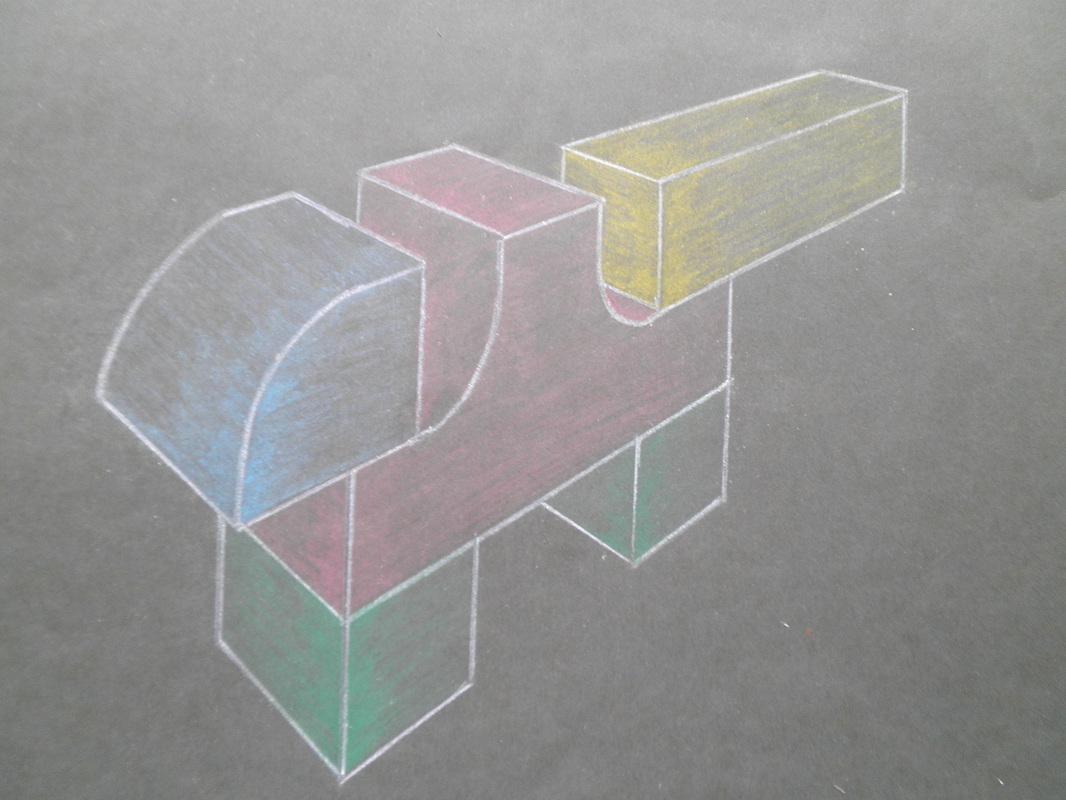
Orthogonal Drawing.
By following the conventions, do an orthogonal and Isometric projection of a simple lego construction.
Sketch up.
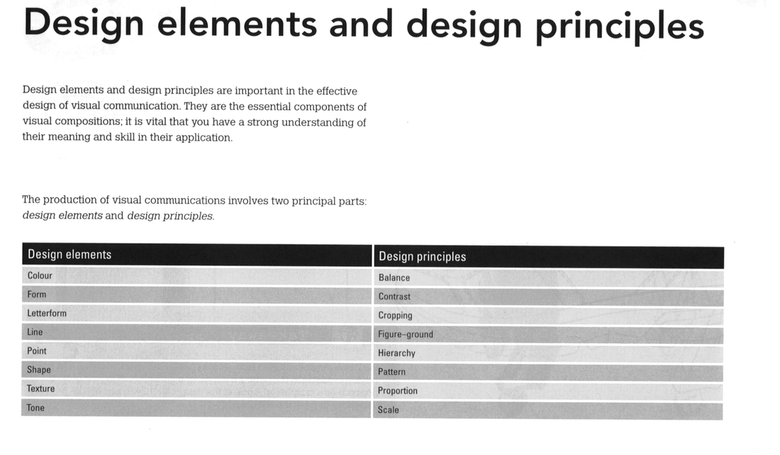
Design Elements and Principles. (VCAVCDE006) (VCAVCDE007)
|
Using Adobe Spark, create a video presentation that demonstrates a definition and an example of each of the design elements and principles as listed.
|
|
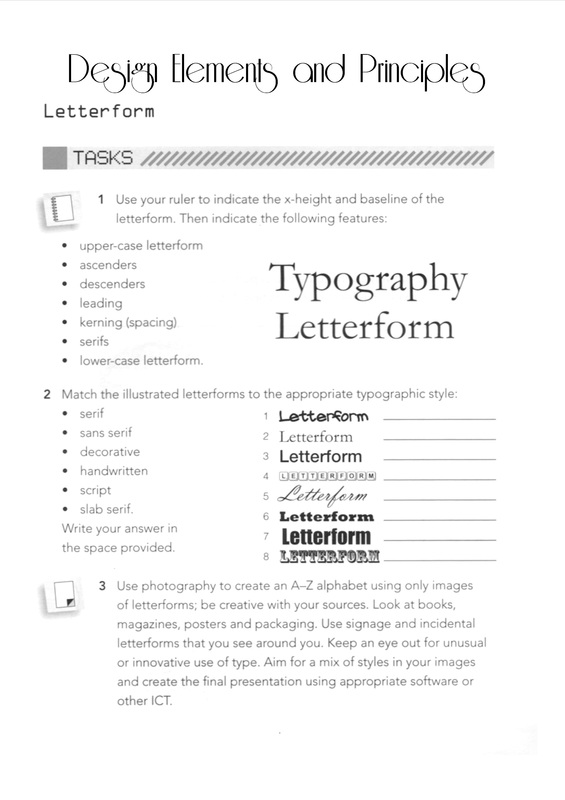
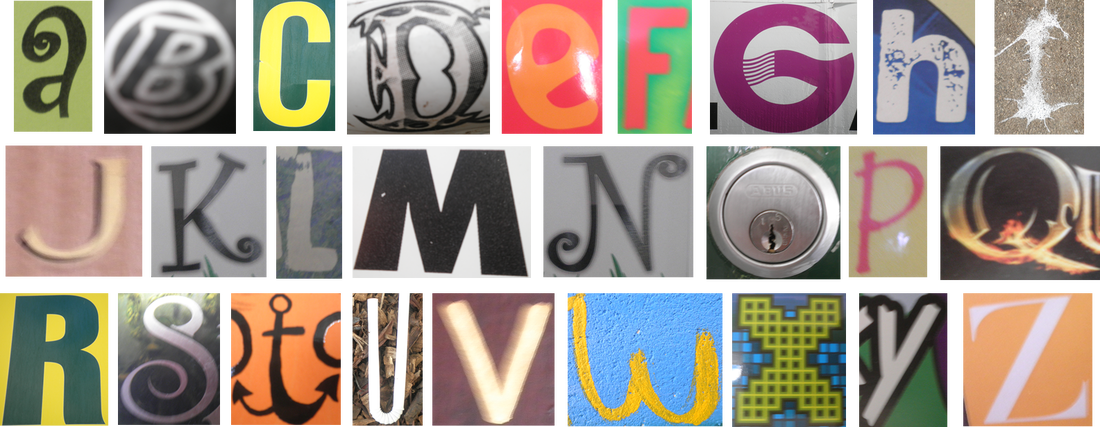
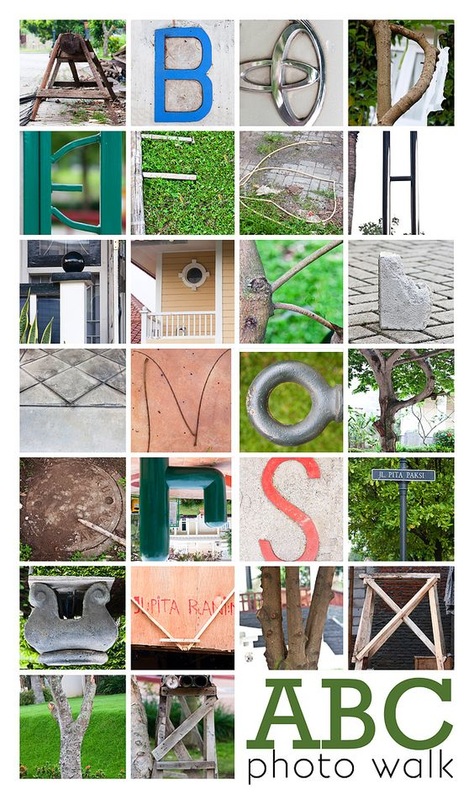
Letterform. (VCAVCDE006)
|
|
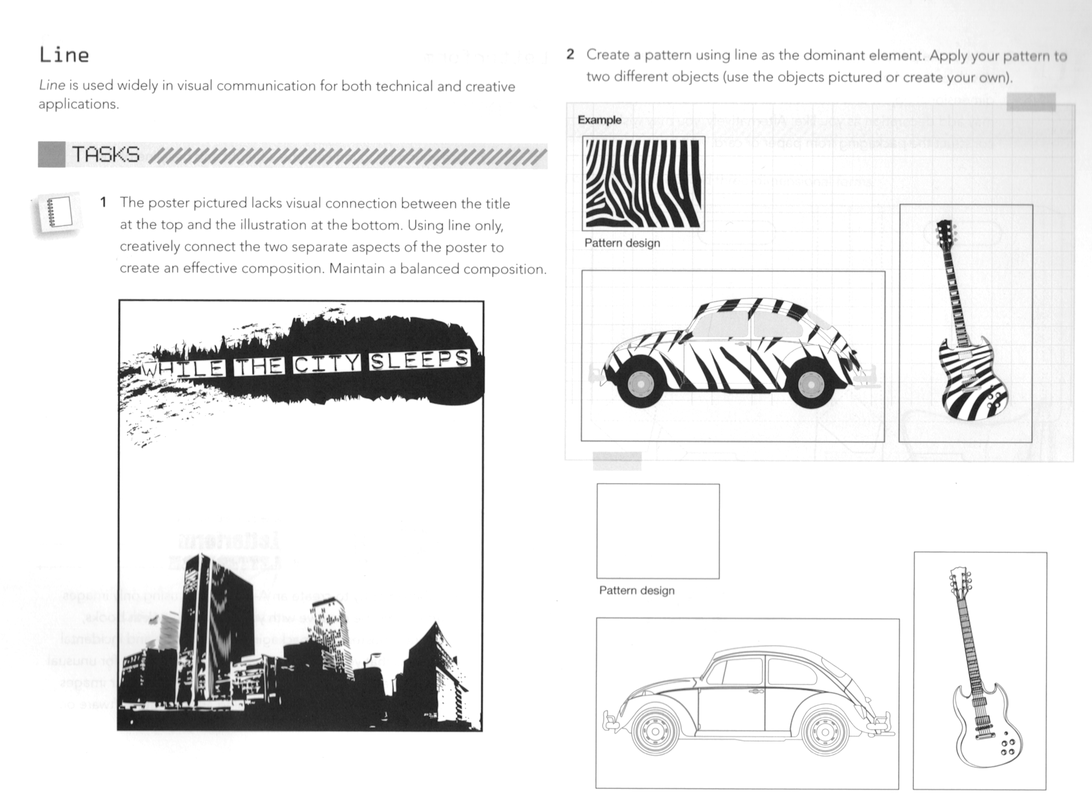
Line. (VCAVCDE006) |
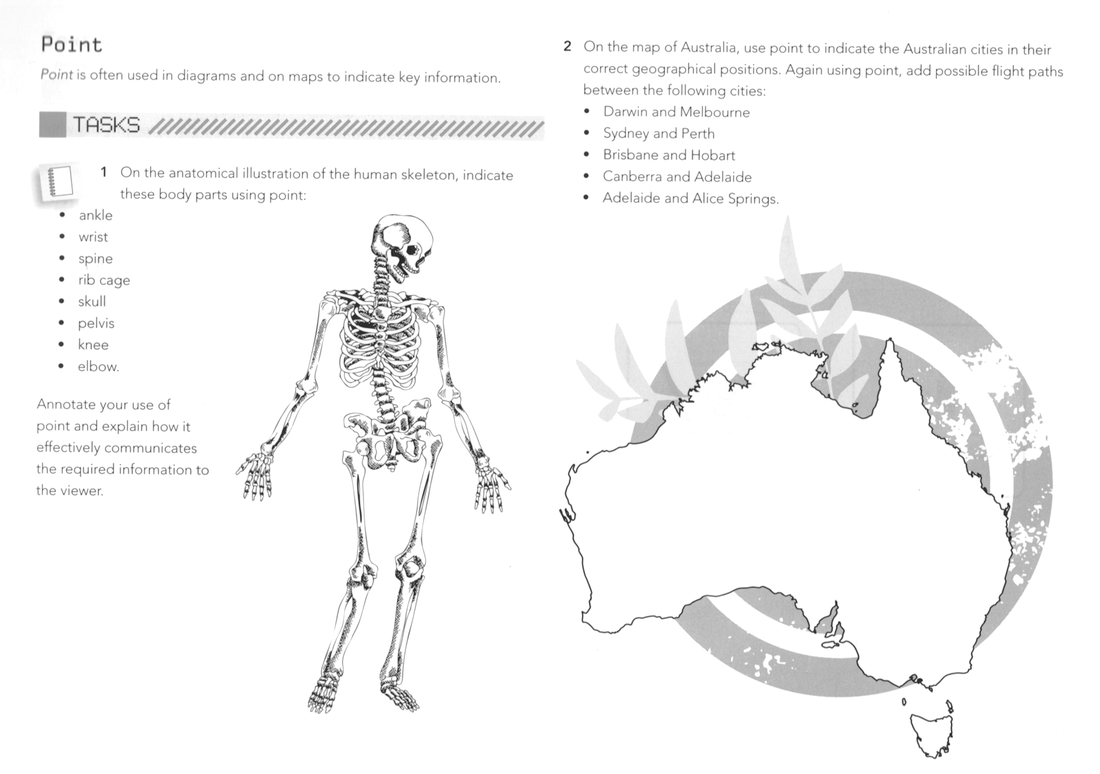
Point. (VCAVCDE006) |
Shape.
*Images should be very neat and precise. Use the computer - perhaps use shapes in Publisher for a start.
|
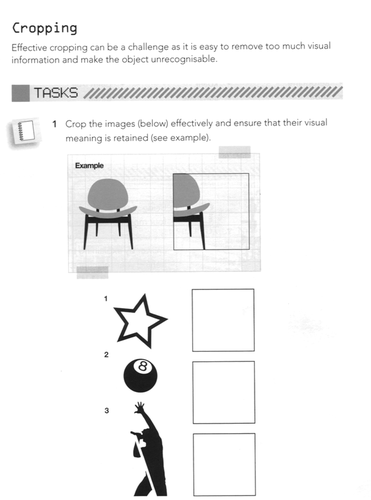
Cropping.Think creatively - you may use Photoshop or other relevant program to complete the task.
|
Contrast. (VCAVCDE006)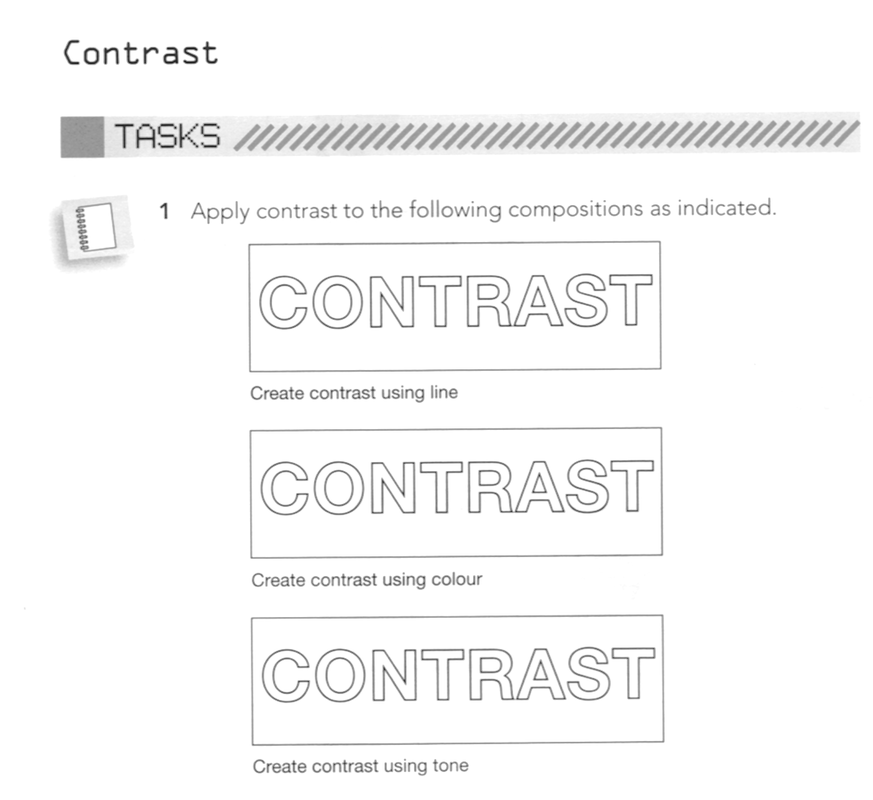
|
Folio Presentation. (VCAVCDE007)Presentation of a neat folio of work that includes a visual diary and finished tasks for assessment.
|
Files
|
WebsitesFont Space – this is one of the best sites as they claim to have 21, 043 fonts in their database. You can choose from the popular ones, or you can look for the newly uploaded ones. It’s up to you. Just click the font name or image and download.
1001fonts - this one’s also claiming a thousand fonts. The only difference of this site from fontspace is that you could actually buy premium fonts here. Other sites: dafont, 1001freefonts, fonts. | |||||


|
|
| ||
Websites
Files
Beer Bottle Tutorial
In your network folder there are images and instructions to do a beer bottle photography task. This tutorial is to be completed and then the image is to be used to create an advertisement for a magazine page for the beer. You must decide what information needs to be included in a successful advertisement the style and colour of lettering used and the target audience the advertisement will be for. This information must be included in research and presented in your visual diary along with the finished products.
Previous Topics.
Files
Mambo art stamp design (VCAVCDV008) (VCAVCDP009) (VCAVCDR011)
|
Stamp Design
By following a theme, design a stamp to be included in a series of stamps based around 'Big Things' tourist attractions for the town you live in. The stamp must reflect the town and the style of the other stamps in the series. 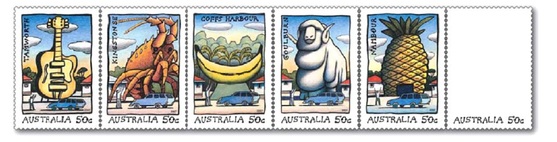
|
Files
| ||||
Isometric drawing (VCAVCDV008)
Technical Drawing

Reworking an image
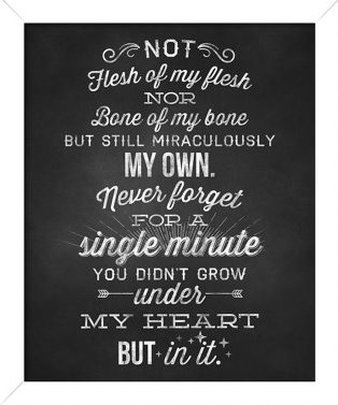
Using the image supplied, create a design of the quote using a variety of similar fonts. Make it A3 and in the 'chalkboard' style. This is NOT a flat black background, it has texture.
- Image needs to be 300dpi so it can be printed.
- Use Photoshop.
- Put each line on a new layer.
- Centre the text.
- Add colour if you like, leave it 'chalky' and pastel if you do.
- Create a variety of solutions and print small images for evaluation.
Visual Diary Front Page
Using Publisher (we will use Photoshop later) explore the use of a variety of text to create your title page.
You must demonstrate the consideration of the following in your design:
Research - collect website information and place into a One Note file/Pinterest/Publisher page. Make sure you note where the source of your images are and annotate as to HOW you will use the ideas (not copy).
· Select and print thumbnails of specific things that you like - annotate what it is that you like about them.
· Your name in the style of a logo
· Subject title (Visual Communication)
· Exploration of upper and lower case variations
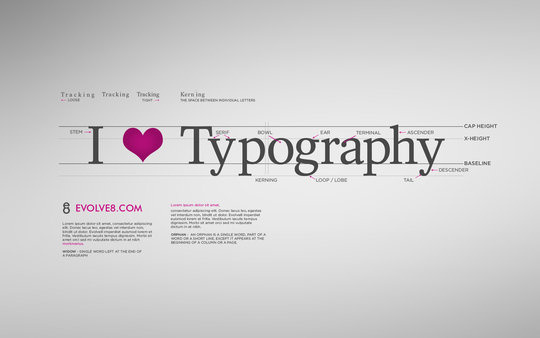
· Letter and word spacing (Tracking and Kerning)
· Creation of at least 4 trial pieces to be printed and analysed for clear decision making processes.
· Exploration of colour and layering of images.
Image and Type
· Using images you have taken and layering text, work through the Working with Type tutorial to demonstrate working with layers and design considerations you have made along the way.
You must demonstrate the consideration of the following in your design:
· Take at least 20 photographs and upload to your computer. Print thumbnails and discuss how you could use each one.
· Choose some of your best images and explore layering the text, font styles and what you have learnt from Task 1, to create a variety of designs. Print various stages of your work.
An extension to this task is to find an inspirational quote and add it to a photograph you have taken.
Exploring a Font
Create an A3 poster that uses layering and design considerations to demonstrate the characteristics of a particular font you find appealing. View the file attached for instructions.
Stamp Design
By following a theme, design a stamp to be included in a series of stamps based around 'Big Things' tourist attractions for the town you live in. The stamp must reflect the town and the style of the other stamps in the series.
Technical Drawing
· Isometric rendered wooden door sill.
· Developmental drawing of folded out cube, with tabs.
Design Process
Watch this space......
Using Publisher (we will use Photoshop later) explore the use of a variety of text to create your title page.
You must demonstrate the consideration of the following in your design:
Research - collect website information and place into a One Note file/Pinterest/Publisher page. Make sure you note where the source of your images are and annotate as to HOW you will use the ideas (not copy).
· Select and print thumbnails of specific things that you like - annotate what it is that you like about them.
· Your name in the style of a logo
· Subject title (Visual Communication)
· Exploration of upper and lower case variations
· Letter and word spacing (Tracking and Kerning)
· Creation of at least 4 trial pieces to be printed and analysed for clear decision making processes.
· Exploration of colour and layering of images.
Image and Type
· Using images you have taken and layering text, work through the Working with Type tutorial to demonstrate working with layers and design considerations you have made along the way.
You must demonstrate the consideration of the following in your design:
· Take at least 20 photographs and upload to your computer. Print thumbnails and discuss how you could use each one.
· Choose some of your best images and explore layering the text, font styles and what you have learnt from Task 1, to create a variety of designs. Print various stages of your work.
An extension to this task is to find an inspirational quote and add it to a photograph you have taken.
Exploring a Font
Create an A3 poster that uses layering and design considerations to demonstrate the characteristics of a particular font you find appealing. View the file attached for instructions.
Stamp Design
By following a theme, design a stamp to be included in a series of stamps based around 'Big Things' tourist attractions for the town you live in. The stamp must reflect the town and the style of the other stamps in the series.
Technical Drawing
· Isometric rendered wooden door sill.
· Developmental drawing of folded out cube, with tabs.
Design Process
Watch this space......
